Medium length hair is great. They grew back, stopped interfering, and they can be beautifully laid. We show simple hairstyles for medium hair for every day, which are quick and easy to do on your own. What kind of hair is “medium length”? In the fashion world each expert has his own opinion. Someone thinks such hair is above the waist, someone - to the shoulder blades. Therefore, it is considered that the average hair length is from the shoulders to the shoulder blades.
Megopopulyarnaya hairstyle, invented in the 60s in France.

Since then, the number of fans of babetta is growing. This is a simple and elegant hairstyle for medium and long hair, decorating every girl and suitable for any occasion, it is enough to harmoniously choose the jewelry. And it is done very simply. Yes, for the first time it is necessary to try, but with practice it will be faster and easier. This is an example of a hairstyle that is easy to braid on medium hair at home.
What you need for this hairstyle
Will need comb, comb for comb, elastic, clamp, stealth, studs, roller, fixing varnish, gel or mousse for styling. It can be useful iron and thermal protective agent.
Properly and safely comb hair - the whole art. there is Two ways to comb your hair: bouffant in the root and bouffant in the strand. Packing in the root is also called tupirovanie or tupirovka. For this strand combed from the inside at the roots of the hair. Bundle in the strand do to the tips of the hair.

How to make hair Babette do it yourself - a step by step guide with photos
- Separate the hair strand horizontally from ear to ear through the crown, secure with a clip.
- Remaining hair, collect in the tail, comb through, secure with a rubber band. This is the basis.
- Carefully stir the tail to the tips.
- Tie the tips of the tail inward to get a cushion, slaughter stealth.
- Carefully comb the upper hair from the bottom and place it on a roller. You can tie the tips of a small rubber band to hold. Wrap gum and tails under the roller.
- Secure with studs.
- Gel or mousse smooth out loose hairs.
- If necessary, sprinkle with varnish.
- A round face will visually stretch, if Babette is screwed on the crown.
- Faces in the form of a square and a triangle look softer with a sparse bang or several curls in the face.
- An elongated and thin face can be distinguished by sliding the base of the babette to the back of the head and placing the oblique bang.
- Girls with large features better make their hair more luxuriant. A graceful young lady with subtle features should not get involved in a pile to look harmonious.

How to make a babette with bangs
- Comb carefully.
- Separate the strand along the forehead above the bangs and pinch the clip.
- Slightly lower on the crown, separate the wider part, so that the hair remains on the sides, and twist it into a tight braid.
- Twist the bundle roll in a bun on the top of the head and secure with studs.
- Again, comb the top strand, scoop it up from the inside at the roots and lay it on the bun, securing it with invisible sticks.
- Take the locks from the temples and pinpoint them with invisible beads under the roller.
- Carefully comb the loose hair down to blend the strands.
- Lay the bangs.
- If you want to release a couple pryadok face.
- Sprinkle with varnish.

A bunch (bun) on the "donut"
Favorite ballerinas gulku (or a bundle) can be made with the help of the so-called "donut".

This simple hairstyle for medium hair is perfect for both girls and adult girls. We show two ways to create such a bundle.
How to make a bunch with your own hands
- Comb it out very well.
- Assemble the tail where you plan to baw, secure with a rubber band.
- Thread the tail into a bagel to half the length.
- Spread the sticking hair evenly over the bagel and gently start to twist them onto the bagel, holding the tips.
- Carefully wind the bagel on your hair so that the bun is at the very base of the tail.
- Correct the loose strands and fix varnish.

How to make a bundle yourself - walkthrough with photos
- Make the tail the first way.
- Thread the entire tail into a bagel so that it lies down around the elastic.
- Evenly distribute hair over a bagel so that it is not visible.
- Secure the resulting structure on top of the second rubber band, so that free ends are left.
- Divide the ends of the hair into strands and weave a pigtail, you can have a few.
- Wind each braid around the base of the beam and secure with studs.
- If desired, decorate with ribbons, hairpins.
This type of simple hairstyle with a scythe for medium hair can be made for a wedding. It is enough to take the appropriate accessories.

How to make a volumetric tail with your own hands
- Comb your hair well.
- Separate the upper part of the hair with the tip of the comb approximately from the ears, through the crown.
- Slightly comb this part of the hair with a comb from the inside so that the uppermost hair remains smooth for beauty.
- Tie a tail slightly higher than the final hairstyle. Fix it loosely so that it can move the gum, without damaging the hair. Throw the long part of the tail forward and fasten it in front with a clip so as not to interfere.
- Loose hair comb and collect in the second tail under the first, secure with a rubber band.
- Remove the clamp and carefully straighten the upper tail so as to hide the lower elastic. If necessary, move the upper gum down slightly.
- Secure with varnish.

How to make a thick tail with your own hands - step by step guide with photos
- Well comb all hair.
- Use a thin hairbrush to collect the tail so that loose hair remains at the edges of the head (see picture).
- Tie the collected tail with a thin elastic band.
- Pick up the left strands and carefully comb them so as to collect, as it were, the outer tail around the already knotted.
- Secure with a second rubber band.

Great tail with crab and stealth
This video will show you how to make a gorgeous tail with a small crab clip. Such an easy hairstyle is perfect for a holiday for medium and long hair. It remains to wear bright earrings and make a festive makeup.
Tail knotted
Classic tail, which is used daily by women, you can diversify and give the image elegance. The main thing is that the gum that holds it, was strong and was able to hold even heavy hair. Stylists advise to additionally fix the gum invisible for hair color.
The tail runs as follows:
- Well combed hair is collected in the ponytail.
- Fixed with an elastic band, securing it for strength invisible.
- Additionally, the tail is combed at the base and a knot of hair is tied over the elastic band, twisting the hair onto the palm of the hand.
- Carefully straighten the knot around the gum and fix it with small studs in a circle at the base of the tail.
A tail with a knot may have different options. Women often tie it at the bottom of the neck. Young girls additionally tie another knot closer to the end of the tail with an elastic band and securing it imperceptibly invisible.
Goddess of Olympus (Greek hairstyles for medium hair)
You can start with austere and stately, but at the same time feminine and stylish Greek images. Such hairstyles are very good also because all matched hairs do not slander at the most inappropriate moments. In such images collected all the feminine nature, identified with the dazzling beauty and essence of the Olympic goddesses - the powerful and powerful, but at the same time loving and tender. That is why such hairstyles are very popular among modern fashionistas, because they are also a kind of mistress - many men's hearts obey their beauty and femininity. It is not by chance that it is the Greek images that so often choose beautiful brides for themselves.
The undoubted advantage of such hairstyles is the simplicity of their execution. For medium hair, Greek hairstyles with bandages, ribbons or elastic bands are best. You can decorate your artworks with flowers, rhinestones, hairpins, green twigs and any other accessories suitable for the occasion.
How to make a quick Greek hairstyle for medium hair with ribbons: step by step instructions

1. Prepare a bandage, for which you can take a pair of wide black ribbons and twist them clockwise.
2. Take both ribbons and start to bind them together, but now counterclockwise. Thus flagella interlock and form a woven base for future dressings.
3. The ends of the flagella must be tied to get a bandage of the desired length.
4. Now you need to prepare your own hair. To do this, they need to wash, dry and curl from the middle with the help of forceps or curlers. The resulting curls need to fix varnish, then put on your head a Greek bandage of their own making.
5. We make the very hair. Separate the first strand and twist it loose flagella. Now wrap it around the bandage several times.
6. Repeat the process with all the free-flowing strands, alternately wrapping them around the ribbons, leaving only the tips free.

7. When finished with strands, correct the resulting hairstyle and then collect loose hair in one bundle.
8. Fasten this bun on top of the dressing knot to hide it under the hair. This should be done with the help of thin black studs.
9, 10 The end result.
As you can see, everyone can create a fast and beautiful hair style in the Greek style. However, the described method is not the only one. There are other options, the creation of which can take both more and less time. The easiest way is to simply put a bandage over the previously twisted (or your curly) curls. Other options can be seen in the photo.


Simple hairstyles for medium hair
If you have curly hair, create a voluminous hairstyle on your head with a hair dryer with a diffuser. First, wash your hair and lightly dry it with a towel. Then separate the hair strand and place it in the “fingers” of the hair dryer. Dry strand no more than 30 seconds. After that, go to the next strand. Thus, dry all hair. After that, beat them a little with your hands. Outwardly, this hairstyle resembles a perm. In order that the styling is well kept throughout the day, before it is created, apply foam onto the hair.
If you do not want to leave your hair loose, make a tail. Gather the hair from the sides, temples and secure them with a rubber band. Loose hair let fall down a waterfall. In general, the hairstyle will look very romantic. And the back strands will not climb into your face.
Create a hairstyle with a rim of hair on his head. To do this, brush all the hair back. Then select three strands from one side and begin to weave a braid to the other side. Spit should be located close to the forehead. During weaving, make new sub-lines from the sides, connecting them with old strands. Fix the end of the weaving stealth invisible. Thus, on your head you will get a bezel of a braid, and the rest of your hair will fall off on your shoulders.
Another interesting hairstyle with weaving: divide your hair into a straight parting and braid two braids. They should start from the back of the head and go down. At the neck level, weave braids into one, and at the place of their connection put on a beautiful hairpin.
Hairstyle
Different hairstyles can be performed on the basis of a pile. It can be done, even if the hair reaches only to the shoulders. To create a pile, you may need a special hair roller. Place it on the top of the head and cover it from above with hair. If you do not have a roller, do your hair without it. First, brush the front hair on the forehead. Then select a wide strand on the back of the head and twist it into a bundle. Lay the harness in a circle so as to make a knob. Fix it invisible. Return hair combed back. They will close the skin.
If the bouffant is very small, add hair to the roots. Then the hairstyle will become more voluminous. When you cover the bump with hair, gather them together and fix them with stealth. This part of the hair should not fall apart. In addition to invisible women you can wear a beautiful hairpin.
Hairstyle with a fleece will turn out very beautiful if you pretwist your hair with curlers. The waves will gracefully fall backwards. In addition, if the hair remains quite a lot, you can braid the braid.
Fast retro hairstyles for medium hair
Once again, fashion proves that everything new is just a well-forgotten old. This can explain the unprecedented popularity of retro-style, in particular, and retro hairstyles. Luxurious and spectacular retro hairstyles look great on medium-length hair. In addition, these hairstyles are ideal for both evening and casual attire. The good news is that these images are created quite easily and simply. To cope with them can every woman of fashion.
Now consider the hairstyle option that you can do yourself in just ten minutes. Picking up the appropriate dress, you can be a real beauty queen at a stylized party.

1. 2 We do a pile of all the hair.
3. 4 We collect strands in a high tail and then lift it up.
5. 6 Grasping the end of the tail, we begin to twist the hair to your face. As a result, the roller should come out.
7.8 We twist all the hair to the end and then fix the roller with the help of invisible women. Pin them to the inside of the roller on both sides.

9. 10 Straighten the roller from the sides, secure it with stealth.
11. In order to preserve the shape of hair for a long time, use lacquer.
12. In order to give the hairstyle even more believable, you can use a small tiara.
13. If you have a big bang, you can make a curl on it, and decorate your hair with flowers. This option is perfect for warm summer or spring days.
14. Alternatively, you can tie a handkerchief around your head. In this case, the hair can be combined with jeans and a T-shirt.
In addition, you can create a fast and stylish hairstyle in retro style with the help of a regular tail and a fleece. The result should be an image of the 60s in the style of Brigitte Bardot.

1. Make bouffant on the crown, which will create additional volume and shape.
2. For greater fixation distribute hair lacquer.

3. It's time to make a low tail. For this you need to collect all the hair on the bottom, namely on the back of the head. It is not necessary to strongly tighten the tail, because we need to leave as much volume as possible on the crown.
4. Once again we recall that the tail should be free. If the gum is tightened too much, you can slightly release the hair.
5. Smooth the hair with a comb-brush. Your goal is to achieve a more round shape.

6-7 Hide the affected gum under the hair. To do this, take a small strand from the bottom of the tail and twist it around the elastic band. Secure the end of the strand stealth.
8. Hairstyle is ready! The final result can be fixed varnish.
Stylish retro hairstyle can be created with a simple rim. To do this, you can slightly twist or comb the strands and just put a gum, a bandage or a ribbon with flowers on your head over the hair.


Quick Retro Hairstyles Medium Hair: Step by Step Photos


Retro hairstyles for medium hair: photo


Other fast and original hairstyles for medium hair (bows, bunches, babette, braids)
Medium hair is perfect for all sorts of original and beautiful hairstyles, which will not take you long to create.A head of hair of such a length allows you to depict all kinds of weaving, bunches, shells, babetta, bows, tails, brushes, rollers and much more. Some of the most simple and elegant options are offered below.
Twisted Tail Bundle
Perfect hairstyle in every way. Fast, beautiful, elegant and versatile. Such a bundle can be worn both for your favorite work and for festive evenings, only in this case it will be necessary to decorate it with additional accessories.

1. Make a short tail and fasten it with a thin and tight elastic band. With your thumb and forefinger, separate the hair in the tail as shown in the photo.
2. Pull the tail through the hole from top to bottom.

3. The result should be similar to that shown in the photo. If your hair is not too thick, then the tail can be turned out several times.
4. Now wrap the tip of the tail several times and fill it with the elastic. Remember that this hairstyle should come out neat. If something sticks out somewhere, it is better to dissolve and redo it.

5. Having tucked the ends of the tail, immediately fix the result with stealth and studs.
6. Stylish hairstyle ready. If necessary, it can be decorated with flowers, for example.
This hairstyle can be left in the form in which it was in step 3. In this case, you get an original twisted tail, which can also be decorated with any suitable elements of decor.
Bagel or regular tail
Very simple and fast hairstyle, the creation of which a woman does not spend more than five minutes. This bundle is perfect for everyday wear. This hairstyle has two versions.
1. Comb the hair and collect all the hair in the tail in the very place where the future bundle will be located.
2. Take the prepared bagel and pass all the tail strands into it to about half.
3-4-5 Try to twist the bagel, gradually twisting all the hair on it. This should be done until you reach the base of the tail.
If necessary, the hair can be fixed with varnish.


1. As in the previous case, build a high tail on the head.
2. In this case, the sock or bagel should be located at the base of the tail, so the hair should be passed through it completely.
3. Carefully and evenly distribute the hair over the top of the bagel. Make it necessary so that the bagel is completely hidden under the hair.
4. Take a thin elastic and fasten the hair in that position. Leave loose ends intact.
5. We divide the remaining free strands into two parts and make braids of them. The resulting pigtails wrap the beam around the circumference and fix them with pins.
6. If there is a need or desire, the bundle can be decorated with decorative elements.

Hairstyle shell
Another option is simple and fashionable hairstyles, which can be easily done on medium-length hair.

1. Before you start to do your hair, it is very important to use a texturizing spray that will help to make your hair docile and soft.
2. Now nazheshite hair on top.
3. Hair left parting also need to comb.
4. Then mix the hair to the right of the parting.

5. Take all the hair in one hand, and the other start combing them in the middle and then closer to the tips. No need to do this overly carefully. The element of easy negligence will go only for the benefit of hair.
6. The ends of the hair must be collected with a thin elastic band. It is necessary to collect them a little on the side, so that in the end the cockleshell will turn out directly in the center of the head.
7. Take the Chinese chopsticks and place them on both sides of the selected gum, then squeeze them.
8. Roll up the hair in the form of shells. You should not worry if the shell comes out of the wrong shape the first time. After a few attempts, you will learn to do it right.

9. With one hand, try to hold the shell, fixing it with chopsticks, while with your other hand, slaughter your hair with invisible hair. You should make sure that you do not touch the invisible chopsticks, because otherwise they will be difficult to remove.
10. If the hairstyle, in your opinion, is fixed well, then you can carefully remove the sticks. Secure the result with varnish.
Below are other step by step options for fast and beautiful hairstyles for medium hair.
Beautiful and fast hairstyles: step by step photos


Beautiful and quick hairstyles for medium hair: photos


Now you know how to create a fast and current hairstyle on your hair of medium length. There are a lot of options. Try, experiment and enjoy the result!

Fast hairstyles for medium hair: 6 comments
Some all hairstyles in the same style ...
Great site! Huge selection! Everything is clear, compact, no need to spend a lot of time on video and listen to different nonsense! Thank you so much. It is a pity that your site was almost the last in my search. He has a place to be first.
Hair just super
Everything is just a class, hairstyles for every taste)))))
and very easy to do!
Many thanks for such great ideas! I always wanted to experiment with hair and come up with new hairstyles.
Medium length hairstyles in the Greek style

The optimal option for all parameters styling for hair of medium length, we believe the Greek hairstyles. Therefore, they open our image of the most practical, beautiful and uncomplicated ways to put a head of hair. In addition to the simplicity of execution, hairstyles in the Greek style have such distinctive features as elegance, femininity and impeccably seasoned style, which favorably distinguishes them from most of the usual everyday ways of styling hair. They will be the perfect complement to any everyday image - business, romantic, free. Another significant advantage of styling in the Greek style is that they allow you to maximize the gathering of the strands, so as not to interfere with the work. Quick hairstyles for medium hair of this type retain their original appearance throughout the day. They form a very feminine image, in which the natural beauty and pride are emphasized. Among modern girls such styling gained the widest popularity due to its simplicity, accessibility and beauty. They allow each of us to try on the image of the Greek goddess, embodied femininity, which conquers men's hearts at a glance. This type of styling often becomes the basis and amazing wedding options, because in the wedding image femininity, elegance and simplicity are appropriate as anywhere else.
On medium-length hair, Greek styling is most easily done using special rubber bands or ribbons. You can easily make such a tape or a bandage yourself. Well, in the stores of women's accessories there is always a wide selection of a wide variety of rubber bands. Also in the Greek piling would be appropriate flowers, herbs and other attractive delicate accessories. With their help, the Greek hairstyle can be made uniquely beautiful.
Quick hairstyles for medium hair in the Greek style are formed as follows:
- In order to make a beautiful laconic bandage for a Greek hairstyle, twist a pair of black ribbons of medium width into flagella.
- Then, the resulting flagella must be interwoven. In this case, you need to move from right to left, so that the flagella do not bloom. So you make a woven bandage, which is still not enough strings,
- In order to complete the manufacture of the bandage, you need to tie the ends of the woven double braid between each other so that the bandage sits well on the head. Instead of a self-made dressing, you can always use any store version
- Hair should be prepared for styling. They need to be washed and dried. Then from the middle of the strands are curled with curling. You can use curlers. After curling, let the curls cool down if a curling iron was used, and then spray it with varnish.
- After that, a bandage made on their own or purchased from the store is put on the head. You can choose an almost inconspicuous thin ribbon or rubber band, or you can give preference to the brighter options with a rich decor. The choice of accessory is determined only by your personal preferences,
- After that, the front strand of hair is separated, twisted with a flagellum and wrapped around the bandage or simply slipped under it. If the length of the strands is quite large, they need to be wrapped around the bandage several times,
- In the same way, you need to wind all the other hair, separating strands of about equal thickness. Not only tips should be wrapped
- Twisted strands need to be carefully spread, put your fingers,
- From the hair in the back of the head you need to form a bundle that must be fastened over the bandage knot. The knot itself must be hidden under the bundle. Use the studs to secure the bundle,
- Give the final styling, sprinkle with varnish.
As you can see, making quick hairstyles on medium hair with your own hands for every day is not at all difficult. This task is the power of every modern girl. And it can be solved in different ways, and not only as described above. Make the process of forming the Greek styling can be even more simple. Or complicate it in order to achieve a more interesting result. The easiest way to put your hair in Greek is that the dressing is simply fixed on curly hair without twisting the strands. It is easy to make a Greek styling without a bundle, when the strands all over the head are simply wound on a bandage. There are other ways to create this hairstyle. Do not be afraid to experiment and find options that are optimal for your case.
Retro hairstyles

In fashion, there are things and phenomena that re-gain popularity from time to time. These include hairstyles in retro style. Today they are again in demand, because they allow us to form unforgettable and unusual bright images. They can be successfully adapted to the everyday work environment, a romantic walk, or a festive occasion. On the average length of hair, such styling looks especially impressive. Depending on the volume of the hairstyle and the accessories used, the retro hairstyle may be appropriate both as a daily option and as an “exit” option. A particular advantage of such styling is that they perform quite easily. Any girl after a couple of workouts will be able to build a beautiful and stylish retro hairstyle.
Fast hairstyles for medium hair do it yourself at home in retro style will be an excellent option for busy girls who want to emphasize their own individuality. This installation can be done in 10 minutes. The order of execution is as follows:
- Every strand needs to be combed,
- After that, the hair is going to the tail on the top, the tail itself rises,
- Then the tail is twisted inward so that a roller is obtained,
- It is necessary to twist the hair to the head, and after that the resulting roller is fixed with pins,
- After that, the roller finishes on both sides and is fixed with varnish,
- As a suitable decoration, you can choose a small tiara or tiara,
- If you wear a bang, you can put it in a beautiful curl,
- This styling is perfectly complemented by colors, especially in the summer season,
- Another version of the original addition of such styling - a scarf, tied around the head.
But this is just one example of how to make an interesting retro hairstyle. There are other ways to perform such styling. A striking example is a hairstyle “a la Bridget Bardot”, very feminine and romantic. It is based on a combination of hair in front of the head and tail. It is easy to perform this installation yourself:
- The strands on the top of the head are filled and stacked in a semicircle,
- The volume received by a pile needs to be fixed a varnish,
- The free part of the strands is collected in a low free tail at the nape. It is not necessary to tighten the tail tightly, as this may deprive the upper strands of the achieved volume. The rubber band should not be tightened tightly, but it is better to even loosen it a little.
- Next, you need to fix the hair with a brush to make the styling even more rounded,
- From the tail is separated a small strand that is wound on an elastic band. The tip of the lock is fixed stealth,
- That's all, Bridget Bardo's hairstyle is ready! To preserve its original appearance, spray it with varnish.
There is another simple way to put your hair on the fashion of the past years. He is to decorate the hair with the usual rim. The accessory is put on the combed hair. Instead, you can successfully use ribbons, bandages, etc. Such a simple, but spectacular hairstyle favorably distinguishes you against the background of the majority of girls with usual tails and ordinary bunches.
Simple and interesting styling for medium length hair

The average length of hair today is preferred by many girls. It is convenient in daily care, and also leaves ample opportunities for the embodiment of a variety of creative ideas to create hairstyles. There are many ways to beautifully pack medium hair without wasting time. To do this, you can use a variety of weaving techniques, the formation of beams and knots, shells, rugs, babette, tails and much more. Below we offer you the most original hairstyles for medium hair, light and fast.
Bundle of twisted tail
If you are looking for a beautiful, simple, practical and elegant styling, then this option is exactly what you need. At the heart of this installation is a simple bundle, and bundles, as is known, are very versatile. Therefore, this installation is acceptable for working days, and for a special evening. A few bright accessories, and the everyday bundle will turn into a festive luxury styling! To form this hairstyle, you need to act as follows:
- To collect a head of hair in a low tail, it is good to fix with a thin rubber band,
- Make a hole above the rubber,
- Fold the hair in the tail in the flagellum and stretch it into the formed hole above the elastic, directing from top to bottom,
- Sparse hair can be turned out in a similar way several times in a row,
- The field of this need to take the tip of the tail and start to wrap it inside. Gently wrapping it a couple of times, you need to fix the hair over the rubber band,
- All operations need to be done extremely carefully so that unnecessary strands do not stick out anywhere. If any, it is better to re-do your hair without such defects,
- In such a setting would be appropriate and large beautiful hairpins, and flowers, and other accessories.
You can stop at step 3-4, where the inverted tail is formed. In this form, the installation will be no less interesting. Reversed tail can also be supplemented with a variety of accessories. Its implementation will require a few minutes, which is especially important in the conditions of the morning time shortage.
Bundle on a donut or tail

Beautiful and fast hairstyle for medium hair with your own hands - this is a bunch. Each girl can make a bunch in less than 5 minutes. A neat, strict or fervent free beam is ideal for everyday images. You can perform it in two ways. Consider the first option:
- After combing out of the hair, a tail is formed where it is planned to place the future bundle,
- A special bagel is put on the tail to create a bundle, the tail is pulled into it approximately to the middle,
- The tips of the tail fit on the donut evenly. Then the donut twists towards the head,
- It is necessary to wind up until you reach the base of the tail,
- Hairstyle is ready, it remains to sprinkle with varnish!
The second way to create a beam:
- After combing the hair is going to a high tail,
- On the rubber fixing the tail, put on a homemade or purchased bagel,
- The hair is distributed over the bagel so that it is not visible,
- Distributed strands are fixed in this position with another gum,
- The remaining ends of the hair should be divided into two equal strands, weave braids of them and wrap the bundle with them. To secure the use studs,
- You can also add a hairstyle with any suitable accessories.
Elegant Shell

If you want to emphasize your own sense of style and excellent taste, then do not neglect such a luxurious styling option, like a shell. If you do not complement the hairstyle with bright accessories, then it will harmoniously complement the discreet business look. It is performed quite simply:
- Before starting work, the hair must be treated with a texturing spray. It will give your hair extra softness, obedience and neatness,
- After treatment with a tool, the hair in the upper part is scorched,
- You also need to do the stuffing on the left and right of the parting,
- Then the nasil is performed along the entire length of the hair down to the tips. It is recommended to achieve maximum volume in order to ensure maximum styling,
- Hand collect the hair in the tail, slightly moved to the side, fix the gum near the tips. Move the tail to the side so that the shell itself turned out in the center,
- Use chopsticks or special chopsticks. Place the sticks on one side and on the other side of the rubber band holding the tips of the tail,
- Hold the sticks in one position and twirl your hair on them, moving to the side,
- This should lead to the appearance of shells from the hair, in the center of which stick sticks. The good shape of the hairstyle will not come out the first time, but after a couple of unsuccessful executions, the shell will get better and better,
- After the shell is formed, it must be fixed invisible. Make sure that the invisible is fixed only hair, not sticks. Otherwise, you will break the form of hair, when you start to remove wands from it,
- If you are sure that the shell holds well, you can take out the sticks. Do it carefully. At the end of the execution give the styling with varnish.
There are many other options for styling medium hair. Each of them is good in its own way and has its own advantages. But the main positive characteristics of styling, proposed in this article are practicality, versatility, simplicity and unusual. These hairstyles will help you highlight your own personality every day. Show your own imagination, do not be afraid to invent and create new simple and interesting styling for medium hair every day!
Make curls

Luxurious waves are very feminine and festive.
The installation instructions are simple, on which we will spend about 20 minutes. We twist tight or flowing waves in different ways in the presence of a flat iron, a hair dryer with a diffuser, curling iron or hair curlers. And the obtained curls are separated by fingers, then fixed with varnish, sometimes fluffed up with a light pile.
Hairstyle with rim

Romantic masterpiece with an average length of curls.
- Comb your hair with a spray of heat protection.
- Now we will make light waves with a curling iron, heated hair rollers or a flat iron.
- Ringlets dissociate hands, making them airy.
- Putting on the bezel, let us slightly curl from the tips to the roots.
- Take turns pushing them under the bezel and fix them with invisibles.
Popular tail

The ponytail is a casual, but very showy and varied styling.
We collect strands with our own hands, tilting the head back, then it will be tight and smooth. The technique is familiar even to children, but some secrets will give her a special charm.

This gum (price - from 60 rubles.) Securely fasten thick hair, and the tail does not fall down.
Tip! Instead of a comb, apply a toothbrush - and get the effect of perfect smoothness.
Exquisite tail

Universal, fast and beautiful hairstyle.
- We shall fix a low tail with a thin elastic band.
- Then lower it down a bit, slightly loosening the tail.
- With your thumb and forefinger we divide the strands in it.
- Now lift up the end of the tail, push it into the hole and pull it down.
- For greater pomp, we can turn the tail a couple of times extra.
- Then gently refuel for the gum.
Tip! Sometimes, for a change, we can stop at step 4, and decorate the original twisted tail with a suitable decor.
Tail with harnesses

Twisted strands are more noticeable on blond hair.
- The styling products will keep this hairstyle neat for a long time.
- Tying a low tail.
- Separate the bang in the middle.
- Now each part is twisted with a harness, picking up new strands.
- Fix the studs.
Tail with scythe

The tail is beautiful and practical with weaving.
- Bottom locks fix with a rubber band in the tail.
- From the upper strand on the bangs weave a free braid.
- Now we wrap the base of the tail with it and fasten it with pins, decorating it with a bright hair clip or a flower.
Elegant bunches

An attractive air beam will masterfully form a fast hand.
Romantic hairstyle will turn on clean hair, dried with a hot jet of a hair dryer, directed from the tips - to the roots, that is, from the bottom up. Simple actions give an exquisite styling in 5 minutes. Only her evening version will decorate with elegant accessories.
Quick styling

This 5-minute styling offers 2 options.
Consider option 1.
- We fix the tail with a bagel at the base, so we stretch the hair through it completely.
- Carefully distribute the strands on top of the bagel, hiding it.
- A thin elastic band will fix the curls, leaving only the ends free.
- From loose hair long bangs can make 2 pigtails and surround them with a beam, securing the hairpins.
- Spectacular decorative elements are good for the evening option.
But 2 version of this installation.
Such a bundle will be volumetric.
- We form the tail in place of the future beam.
- In a bagel, we will sell all his strands to half.
- Gradually twist the bagel, winding all the hair on it until the base of the tail.
Low bulk bundle

In 15 minutes we will create a bright and feminine image.
For the formation of this stylish beam, we will perform such actions.
- When drying the hair dryer clean hair use a round comb to increase the volume of hair.
- Then a little curl curling strands, moistened with a thermal protective agent, foam.
- We add curls at the roots.
- Hairpins chaotically fasten them in the form of eyelets.
- Then fix the styling varnish.
- Exquisite air beam ready.
Modern braids

Youth fashion popularizes the French pigtail.
Tight braid looks business-like carefully, and will last for a long time. So you can go to school with her or go in for sports.
And slightly fluff weaving is more romantic and playful: for this we stretch a little, loosen the loops of the braid. Decorate your hair with fashion accessories.
French braid

Spit is appropriate and fun party, and hiking.
The order of weaving is as follows:
- separate the strand from the bangs and divide it in three,
- weave a pigtail, picking up new hairs on both sides and laying them on top,
- Now we fix the pigtail with an elastic band, a ribbon or a hairpin.
Spit contrary

An eccentric pigtail will become the opposite when it is interlaced.
- That is, we do not put all the strands from the bangs on top of each other, but weave the weaving under the bottom.
- With such an interlacing in the pigtail we add constantly loose hairs from the bangs.
- As a type - extension at the end of weaving due to the addition of long curls framing the face to the right or left, or immediately from 2 sides.

A thin pigtail is sweet and on the bottom of a bang.
- We have the ability to independently adjust the volume and height of the bangs.
- We carry out the already familiar technique of reverse French braids.
- The hair on the back of the head as usual we put in a low bun.
- We fix the braid on top of the bundle.

In the photo - a fantastic effect of flowing waterfall from medium-sized curls.
Create such a luxurious styling easy and fast.
The special attraction of this hairstyle is its uniqueness: we rarely see it on the street.
- The essence of the process is that the weaving resembles a well-known spikelet.
- We already habitually add new hair to the strands for the subsequent weaving loop.. However, at the same time we release the already intertwined strand, turning it into a free trickle. This is exactly the curl that would cost to put in the middle.
- Instead, we will pick up next to the new curl, which will replace already released.
Medium length haircuts are the most practical and give the maximum number of great styling options. Therefore, stylists recommend this length as the most fashionable, because quick and easy hairstyles for medium hair are completely accessible and convenient for us to do it yourself.
As you can see, in just 5-10 minutes we will skillfully create an excellent fashionable styling that will transform our look in a winning way. We will invent such hairstyles ourselves, letting our fantasy go free. But first, we will watch the video in this article, and bold improvisations and experiments are guaranteed to make us beauties.
Two plait braid
Wonderful neat styling that you can easily do yourself. This is an unusual pigtail, so your appearance will be simply amazing.
Comb your hair well and collect it in the tail on the back of your head. Optionally, perform on the top of the bouffant. Divide your tail into two halves, twist each into a tight bundle. Then twist the two strands together to the very end. Drag the tip of a beautiful rubber band. Spray the braid with varnish, for better fixation, if necessary, correct it with your hands. Hairstyle is ready.


Spit bundle
Fashionable hairstyle in the Greek style. Slightly careless styling of the braids, assembled behind the studs, will make your image unique.
First you have to braid your braid, starting from the top of your head. Strands seize wide, so the hairstyle will acquire the desired volume. Then collect the hair in the neck and drag the tail with rubber.
Twist the ends of the curling iron so that they are well curled. Lift the locks up, use the pins to hold them. You should have a bunch of curls.

Interesting bouffant and loose hair
This hairstyle belongs to the category of feminine and romantic. It can be done on a date or a romantic meeting, a simple walk or a meeting with girlfriends. To do it, it does not take much time.
Comb your hair well and apply mousse over its entire length. Roll the top of the head, sprinkle a little varnish on the back side to keep it better.
Lift hair and collect strands from the temples. All pin up a beautiful hairpin in the manner of malvinki. Hair on top should be smoothly laid, the ends can be curled a little. That's all, hair ready.

Sloppy bunch
Hair, for which you need very little time. The result will be easy negligence of the image. Do not forget that for this hairstyle and the appropriate outfit.
Curl your hair well. You can do this with a curler or braid pigtails for the night. Curled locks do not need to be combed, just separate the curls with your hands and pull off with a thin rubber band. Hair at the frontal part while fasten separately.
Now take the pins and stab the long strands of hair from behind into the bun. Make it as careless as possible. Now lay the hair pinned on top of your side, and you will have a cute curl at your temple.


Curls in retro style
As with all the hairstyles in retro style, you have to tinker a bit. However, it is still easy to perform. To make this styling, you will need stealth, hairpins-holders and bandage-bezel.
So, first, select a large strand of hair near the forehead. A bang will be formed from it. Bye her. The rest of the hair must be curled in large curls. Do this gradually so that all strands are well twisted. Use locking tools to keep the curls better.
Now twist the bangs. With the help of curling, twist it inside and fix it with stealth so that they are not visible. The last step in the hairstyle is the dressing. Put it around your head and tie a flirty bow.


Hair "Bow" of their hair
Wonderful hairstyle that does not lose its relevance for the summer season already. A good option for a youth party, and social events, and for everyday hairstyles. Run it yourself well, very simple.
Comb your hair and whip it a little - the strands should be a little airy. Now take a thin elastic band and tie up a high tail, and in such a way that at the last passing of hair through the elastic band the end of the tail remains in front.
You should have a gullet on the top of your head. Then divide it into two parts and wrap the tip of the tail there. Secure everything from behind. A bow of his own hair is ready! It will not be superfluous to use fixing means to keep it better.

Air shell
If you are going to go on a romantic date, then this hairstyle will be a wand for you. The use of flowers or beautiful hairpins for decoration will be very useful.
Prepare for haircuts studs in advance. Beat your hair with your hands so that they are slightly careless. Now collect them in your hand and begin to twist into the shell, tucking your hair, as shown in the photo. Fasten well the bulk of the hair with hairpins.
The tips should be laid in artistic disorder and fixed, if necessary, invisible. Be sure to use varnish, so the hairstyle will be better to hold.
On the side of the shells, you can wear a beautiful hairpin or use those that have a beautiful top instead of ordinary hairpins. So the hairstyle will look more elegant, feminine.

Bundle made with knots
This version of the hairstyle is suitable for everyday wear. In the morning you can complete it very quickly, so it will not be superfluous if it is in your arsenal.
Comb your hair well, collect them in the tail on the back of your head. If there is a bang, then separate it from the total mass of your hair. Now divide the tail into two parts and tie knots on it along the entire length. Pull off the tip of the rubber band.
Now take the studs, make a bunch of tied spit and fix it. You can wear this hairstyle using a variety of accessories in addition.

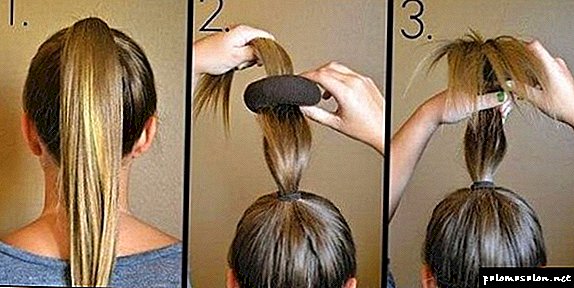
This is the easiest version of the famous babette. To perform it, you need to get a special bagel, so you will greatly facilitate your work.
Comb your hair well and collect it in a high and smooth tail. Put a bagel on it. Prepare another gum. Now wrap a bagel with your hair and fix it with a rubber band as shown in the photo.
Divide the tips of the hair into two parts, twist into bundles and wrap the base of the babette. Use stealth for fixing. Hairstyle is ready.

Braids in the tail
A hairstyle, when performed independently, requires some skills, so before the final version you should practice a little. For weaving, you will need a rubber band and several pins-holders.
Comb your hair and separate them into a parting. From one half it is necessary to make a braid. It is better if you use the reverse weave, which is so popular now. This hairstyle with him will look much better. Exactly the same braid braid and from the second side, fixing the hairpin.
Now connect them with a rubber band in the tail.It is better to make it lush, for which you can comb your hair a little or curl with large curls. Spit a little pull the edges so that they become more voluminous. Spray hair with hairspray. All is ready.


Summing up, you can see that simple hairstyles for medium hair with their own hands are quite easy to perform even for novice fashionistas. Having picked up in addition hair accessories, your image will become finished and will get a special highlight. Do not be afraid to try new options, especially those that seem difficult to you. So every day you can change your appearance and be completely different.
Simple hairstyles for medium hair do it yourself: video tutorials
Greek hairstyle with bandage
Light hairstyles on medium hair were worn by Greek goddesses from the time of Odyssey. In those days, the hair kept tapes and headbands from natural fabrics and thin leather.
 Greek hairstyle is considered easy to perform. On medium hair it can be done in 2-5 minutes.
Stylists in modern fashion shows also do not bypass the feminine and gentle hairstyles by creating new images:
- All Greek hairstyles with bandages are created with the addition of volume at the top of the head. To do this, use a comb with frequent teeth or iron corrugation. Make basal bouffant.
- Gently covering the top of the pile, put on a bandage. It should be noted that the bandage will squeeze the hair. If there is a bang, then it will have to raise the curlers or curling at the roots of the hair.
- The bandage is fixed on both sides stealth. From the temple without pulling, take a strand of smoothly combed hair, slightly spin in a spiral, and fill the top of the bandage. Straighten the volume of the curl.
- A piece of hair is added to the remaining strands from the bottom, they roll and curl the curl next to the previous one. Continue in a circle.
- Each vertical spiral is disassembled with fingers, adding volume.
Choosing a gum or a bandage for the Greek hairstyle, be sure to try it on. It will have to be worn during the day, and it should not squeeze the blood vessels of the head. Convenient bandages with elastic bands.
Greek hairstyle from the tail
Beautiful holiday hairstyle can easily work on medium hair with the help of a tail. Greek style in hair, gives the image of a woman proud to become Greek beauties. For pomp, you can add patch curls.
Particularly beautiful hairstyle from the Greek tail to one side:
- The whole mass of hair is worked out with an iron with a corrugated plate. You can use powder to increase the basal volume.
- The hair of the back of the head is separated horizontally and vertically twisted the strands into curls. If necessary, attach the curled strands over curly.
- Gradually separating horizontally, wind all the hair up to the crown. In each row twisted curls pull and add volume.
- The hairs on the crown are vertically divided into three partings and with the help of powder they add basal volume. Slightly combed at the roots and worn, directing the curls to the side of the hairstyle.
- All hair is transferred to one side. At the bottom of the nape make several harnesses and fix them invisible, forming a hairstyle.
- On the basis of a light texture hairstyle create a Greek tail. Starting from the top, from the back of the head and at the temple, several small strands are taken and closer to the end the tail is tied with a transparent mini rubber band.
- Above it make an opening and turn the resulting tail. Similarly continue, moving down tying and twisting tails through the same distance. Several strands pull.


Close tails should not be tied, it will allow to keep the bulk. Greek tail comfortable hairstyle. Because due to the knotted tails it keeps its shape well. It is easy to perform and is perfect for special occasions. Stylists often make them brides.
Hairstyle of twisted tails
An original hairstyle that will look more interesting if you add volume, passing along the strands with an ironing plate with a corrugation.
For the splendor of the tail in a solemn hairstyle, you can pin extra strands under the first tail:
- Separate a small part of the hair on the crown, add the basal volume with a light pile and using a transparent mini elastic band to tie a loose tail.
- A small hole is made above the rubber band and the resulting tail is pulled upwards from it.
- Continue, separating from the temple to the back of the head strands of hair, connect them with the previous tail and similarly turn out. The distance between the tails should not be too large.
Having finished to collect hair, you can wind up the rest or just leave the tail decorated with a barrette. In any case, the hairstyle will look more interesting if you give it a textured volume, slightly pulling the hair from the tails to the sides. Rubber is better to use silicone.
Malvinka with braids
The hairstyle is named after the famous heroine of the children's film. Since then, she has a lot of modifications.
The version with braids allows you to diversify it in an original way:
- From the temple to the top spend two horizontal partitions, while separating the upper part of the hair.
- The hair of the upper part is combed at the roots, or it is added with the help of a flat iron with a corrugated plate.
- From the temporal part of the selected strand of hair and weave a horizontal braid on the entire length of the hair. Temporarily fix its end with a small rubber band.
- At the other temple do the same.
- Each braid is expanded by hand, giving it volume. Fix varnish.
- Spit together at the back of the head with a rubber band. They should not be too tight.
- Rubber can be covered with an interesting hairpin. Wedding brides decorate and cover the gum with flowers.
- The remaining ends of braids dissolve and comb along with the bottom of the hairstyle.
- With the help of curling, the lower part of the hairstyle is wound in spirals.
Malvinka with a bunch
The fairy tale heroine's hair was decorated with a huge bow. In the modern version, it looks much more elegant.

This hairstyle done quickly and simply:
- On combed hair, the parietal zone is separated from the temple to the temple.
- With the help of the iron with a corrugated plate, they create a basal volume (if there is no ironing, the hair at the roots can be slightly combed).
- Gently combing all the combed hair to the top of the head, collect them in the tail. In this case, the hair does not stretch, trying to keep the volume of hair.
- Above the rubber band make an opening, and turn the tail through it. It turns out a small roller on the sides.
- Because the tail of a small volume on the gum put on a roller in the hair color. Having stretched tail hair through it, evenly distribute them around the circumference of the roller. On top you can wear a gum that evenly fix them under the roller.
- The remaining ends of the tail are wound, and pin are fastened to the bunch, forming them in the form of a rosette
- The bottom of the hairstyle is wound in strands on the curling iron or iron.
- Sort curls, fingers beating, give volume to hair.
- Fix varnish.


If there is a bang, it should be raised with the help of curlers of large diameter or curling. Good fixing varnish to preserve shape.
Half-hairstyle hairstyle
Easy hairstyles for medium hair allow you to quickly create an interesting image for a woman without taking a lot of time.
The habit of simply twirling a curl on your finger can help create an interesting hairstyle:
- Smoothly combed hair is divided into a central parting.
- From the temple to the ear they take away the side strand of hair and twist it into a bundle along the entire length. On the nape fix the tip of the invisible to the hair.
- On the other side do the same.
- The second loose strand behind the ear is taken away and also a bundle is twisted, but already smaller.
- All 4 harness collected at one point, fixing a rubber band.
- The rubber is twisted around its axis along the strand.
- The remaining ends of the braids can be brushed with the lower part of the hair and decorated with a beautiful hairpin or put into a small original bundle with the help of hairpins and curlers.


Hairstyles from harnesses are beautiful, easier to perform and look beautiful on well-groomed hair. Owners of light curly curls and curls will have to straighten them using the ironing. For better plasticity and uniform torsion, it is good to process curls with styling.
Side low sloppy bunch
Light hairstyles for medium hair can be varied by adding to them small interesting details. If the hairstyle is transferred to the side, then from the opposite side you can weave several thin braids.
Also help to collect thin short hair plait twisted from the temple behind the ear:
- The basis of a good bundle is a tight gum to her hair is collected in the tail with one hand.
- The tail is divided into 5-6 strands depending on the thickness and treated with a means for laying with thermal protection.
- Curls cheat in different directions.
- Holding the end of the stretched curl, fingers pull it up, giving volume.
- With the help of small hairpins, the curls are alternately fastened in a spiral around the elastic band, creating a sloppy bunch.
- Several strands can be pulled out of the beam and secured with varnish for reliability.

Elegant negligence has always been in fashion. It should be a little practice to hairstyle looked that way, and not disheveled lump of hair.
Bundle with bagel
Bagels or rollers are used to give hairstyles volume. They come in various thicknesses and colors.
The bundle with a bagel of large diameter attached to the highest point of the head looks spectacular:
- Hair combed well and collected in the tail at the crown.
- Gum additionally secure stealth or stud.
- The tail as much as possible lift up and put on it the bagel of large volume. In this case, they do not reach it to the gum, they stop at about the middle.
- The upper part of the tail as a nimbus is located around the donut and is neatly tucked under it.
- Holding with two hands, the bagel rolls evenly, moving to the base of the tail.
- The result is a tight smooth beam, which is easily fixed by several invisibles.


A bundle with a bagel holds very tightly on the head. If you want to give the hairstyle an evening version, you can leave a few strands of tail unspun. They are placed in a circle at the base of the beam in a smooth or corrugated version.
French Weave Headband
Light hairstyles for medium hair save a lot of time, at the same time allow you to create a unique image every time:
- Hair combed well, head bent to one side.
- At the base of the hair behind the ear, they parse the parting, trying to make it one width wide, and end there on the opposite side.
- The remaining hair on the back of the head is collected in a temporary tail.
- On the separated part of the hair weave a horizontal one-sided French pigtail. Spit have a maximum parting.
- Strands are trying to take thin, because the spit to the end of the rim thickens. Braid tighten as tightly to the head.
- Having finished weaving the bezel, weave a few centimeters with a simple braid, tie a rubber band and comb the tail together with the bulk of the hair of the back of the head.
Rim option in the French weaving technique:
A bunch of two crossed braids
Braids can turn into amazing hairstyles. In this case, even schoolgirls can make them themselves, hitting at the same time mom and girlfriends:
- The hair is divided into a middle parting. It can be straight, oblique, or zigzag.
- Braids begin to weave behind the ear, not much tightening the first strands.
- When finished braiding, braid stretch your fingers, increasing its volume.
- Two braids are tied in a knot, repeating several times. This creates an interesting volumetric bundle.
- The ends of the braids are hidden among the knots, fixing the hair with hairpins and stealth.
Such a node is often located on the back of the head closer to the neck. It is perfect for everyday hairstyles, and evening option.
Hair bow
It is possible to create a bow of hair in several versions, but for each of them a strong hold lacquer will be required. The base of the bow is tightly tied with a strong elastic tail.
It can be one on the top of the head, two on top to the sides or created on the back of the head with flowing hair:
- Gather the upper part of the hair to the back of the head on the basis of the Malvina hairstyle. The tail is fixed tight elastic.
- At the last turn of the elastic band, the tail is not completely pulled through it, but leaves a loop of the desired size.
- The loop is divided in the middle into 2 parts and bred around.
- Above the rubber band in a small opening stretch the remaining tail several times and fix it invisible.
- The sides of the bow straighten, add volume and pour varnish.


If the bow is formed on the crown, it should be even, high and voluminous. A bagel is good for this. It is inserted into the middle of the bow loop. High and gently straightened.
Next, pour lacquer strong fixation and allow to dry. Carefully take out a bagel and fix the bow inside. The remaining tail also serves as a knot in the middle. Just threading it under the tightly tied tail is more convenient with a hook.
The options of light, but elegant hairstyles on the hair of medium length every day adds a great variety. A prerequisite for hair curling on a curling iron or ironing it is to take care of the means of thermal protection.
Article design: Svetlana Ovsyanikova