In recent years, the “Bow of Hair” hairstyle has become very popular. Step-by-step instructions for creating such a hairstyle and is the main topic of this article.
You should understand that there are a large number of ways to make such a work of art on your head, but there is no point in describing them all in one article. There will be described only one way, the most convenient and efficient. It is suitable for both short and medium to long hair. So, if you want to get a good haircut "Bow of hair", step-by-step instructions from this article will help you to cope with this.
What is necessary

So, what do you need to get a good haircut "Bow of hair"? Step-by-step instructions described in this article - this is the first and most important tool that will help you to avoid mistakes and make the perfect hairstyle.
However, at the same time you will need to acquire other tools - firstly, it is a comb, with which you can put your hair in order and make it as smooth and smooth as possible. If they are sloppy and tangled, then you are unlikely to get a beautiful hairstyle - if at all. You will also need at least one hair tie and the maximum number of invisibles available to you. The design on your head will not be very strong, so the better you fix it, the greater the likelihood that it will last for a long time.
If we talk about reliability, then you will also need hair spray, preferably with maximum fixation. When you have everything you need, you can start creating the hairstyle of your dreams. Please note that the hair immediately after bathing may be too smooth and slip out, so it is best to wash your hair in the evening. A hairstyle to do in the morning. That's when you have the easiest way to get hair "Bow of hair." Step by step instructions describe in detail how to achieve the best result.
Step one

The first thing you need to get a good hairstyle "Bow of hair" - step by step instructions. Photos of celebrities with this hairstyle are usually incredibly impressive, so you should carefully follow all the instructions so that you get the same impressive result.
First of all, you need to choose exactly where you will have a bow - most often it is made at the crown, however you can choose any other location. It depends on exactly where you need to collect the hair in the tail and secure it with an elastic band, which you have prepared in advance. This tail is the base of the bow, so fasten it as securely as possible so that the hair does not fall out of it. So you will set the point where your bow-hairstyle will be held.
For long hair, the instructions are exactly the same - you just do not need to collect all the hair, but you can take two large strands, but the place where you will fasten it with an elastic band will still be the center of your hairstyle.
Step Two

To deal with how to make hair "Bow of hair", you need to strictly follow the instructions. When you make out a tail on your head, make a kind of loop of it, sticking the tip of your hair into a rubber band. You can control the size of the bow, leaving a longer or shorter tip. Do not worry about how long it will be - later you will be able to disguise it so that it will not be visible.
Focus on what you want to have the size of a bow. After all, you want to get a good haircut "Bow of hair"? Photos that you take later will delight you for a long time, and you will be able to show them to all your friends so that they envy. Therefore, now we have to suffer and focus on the not very simple process of creating a bow.
Step Three

As you can understand, this guide is universal, so it can be attributed both to those that allow you to make hairstyles for long hair, and to those with which you can get hairstyles for medium hair. The bow is not visible yet, but quite soon you will be able to see it. To do this, flip the tip of your tail forward - now you will need to fix this hair with invisible hair. Do not worry, this is a temporary measure, later you will change the location of this hair, but at the moment it’s worth fixing it in front.
Hair "Bow" for short hair may at this point be a little more difficult, since the tip of your tail, most likely, will have a small length and fix it will not be so easy. So you have to take extra steps very carefully so that the tip of the tail does not interfere with your hands.
Step Four

It's time to take a loop from your tail. Your task is simple - to divide this loop into two equal parts - this will be your bow. However, the simple task seems only at first glance - the fact is that both halves must be identical, otherwise the bow will look asymmetrical. Of course, you can specifically give it a careless and asymmetrical look, but you need to understand that many may not understand and appreciate your idea, and then the effect of a stylish hairstyle will disappear.

Perhaps you have already begun to think about why you needed the tip of the tail, which you fixed invisible. It's time to ask this question, because now you have to get rid of the invisible and release this tip. For what? You need to very carefully transfer it from the front of the head to the back of it, while the tip should pass exactly between the two halves of your bow, dividing them with a clear border.
This should be done very carefully. Any inaccuracy can either damage the hairstyle, and you have to start over, or affect the final result. So act extremely carefully and cautiously - at first glance the task may not seem very difficult, but in practice everything is a little more complicated than you might think.
Step Six

When the tip, thrown back, is given a neat appearance, when you have verified that both halves of the bow are identical and look harmonious - only then you should proceed to the next step. He is one of the last, so you can relax, take a break - and get down to business.
Your task is to secure the entire structure with the help of those invisible beings Previously, you secured the tip of the tail with their help in front, but now you should repeat the operation more carefully and carefully. As you remember, the tip of your tail is already at the back and you need it to stay there, dividing your bow into two halves.
To do this, you need to use stealth, but this time not as a temporary measure, but as a very important element of the whole hairstyle. Use as many invisibles as you think is reliable enough, because you are at a very important stage of creating your hairstyle. Only when you are one hundred percent sure that the tip of the tail is fixed securely, proceed to the next step.
Step Seven
So, the main work is left behind, your hairstyle is ready, but so far it looks rather damp and unreliable. Therefore, now you face a serious task - during this last step you will have to give your hair a final look. Correct both halves of the bow, give them more volume, flatten the tip of the tail that divides your bow in half. Only when your hairstyle will look exactly as you planned, proceed to the final stage.
Take hairspray with strong fixation and use it on the resulting bow so that it acquires maximum strength - after processing the varnish you will be able to avoid the fact that individual hair and curls will fall out of your design. Hairstyle should hold out for a long time and please you and others until the evening.
Other options
As mentioned earlier, this is only one of many options for creating a bow of hair on the head - there are a lot of them, but in most cases the foundation is the creation of a tail and its division into two halves. Approaches may vary depending on what your hair length, as well as what effect you want to achieve in the end. You can safely experiment by adding arbitrary elements - you have a reliable base in your hands, on the basis of which you can now create a hairstyle on your head at least every day.
Styling features and history of its appearance
A butterfly-eight, assembled from curls - one of the variants of the classic beam. The essence of laying is simple. Smooth locks gather in a tail and are divided into parts, at the same time their ends remain under an elastic band.

Then the strands are finished in the form of petals and pinned around the base of the tail in a certain order, some of them can remain free.
The design is located on the back of the head, on the crown, in the center of the head or on the side.
If necessary natural strands can be supplemented with invoices, and decorate the finished styling with decorative pins, ribbons, artificial or fresh flowers.
The idea of laying in the form of a bow goes back to traditional geisha styles. Spectacular bow on the head considered a symbol of youthfemininity and sophistication. Similar options were found in Western Europe at the beginning of the XIX century.
Nowadays, fashionable women are obliged to the appearance of this simple and unusual styling by pop divas, actresses and other public figures. Lady Gaga, Paris Hilton, Sarah Jessica Parker and other style icons came out with funny bows.

Stylists who quickly picked up a new fashion trend offer a variety of options for this styling, from strict classic to mischievous and careless.
Bows are especially popular in Japan, with its cult of young girls. Dense, heavy and shiny Asian curls easily fit into the eight, do not require pre-straightening and processing locking means.

Try a gelatin hair lamination procedure at home using our helpful tips.
And here you can see a lot of photos with options for hairstyles for a round face.
Recipes cooking masks to care for your hair! Mask for growth with mayonnaise and egg - the recipe can be found here.
Useful tips: master the subtleties of hairdressing
Before you start creating a beautiful bow, consider its location and shape. Tall girls are better placed on the back of his head, miniature, you can lift the design at the top of the head to visually increase growth.

A laconic version of two or four parts is suitable for an office or an evening out, looks more spectacular in the evening a combination of a small flirty bow with loose strands.
Getting started, you need to wash your hair and treat curls smoothing indelible conditioner.
Wavy strands are recommended to pull the iron, after spraying with a heat protection spray. The smoother they are, the more beautiful the bow looks.
Choose accessories carefully. Gum and hairpin should not pull out and spoil the hairs. Purchase products of neutral color, they should be completely invisible in the installation. If you wish, you can decorate the bow, jokes a flower or a large flat barrette.

Classic option: stylish and easy
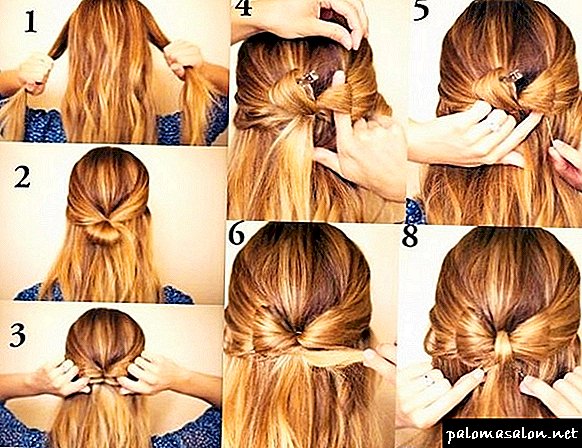
Comb the curls, lightly spray them with varnish to facilitate the work. Collect strands in tail on the back of the head and secure with a rubber band. The tail must be securely fixed, the strength of the structure depends on it.

If desired, a few strands can be left free, they will make the hair easier and more informal.
Making the tail, skip the curls through the gum not to the end. They have to lock in at the base so that the rather long tips remain free, and the middle part forms a loop.
Flip free ends forward and secure with a clip.
The loop is divided into two equal parts. Straighten each one in turn so that it forms a wide lobe, and fasten with pins and stealth. Petals should be perfectly symmetrical..
Remove the clip from the ends of the strand. Take the tips back, masking the gum at the base of the tail. Gently tuck the tips under the gum and pin the hairpin. Classic bow ready. Loose strands can be curled with forceps. Spray your hair with a shine polish.
In this picture, step by step instructions with a photo of how to make a hair bow of hair:

And in this video you can see how to braid a bow haircut on medium-length hair with your own hands:
Romantic look: butterfly on loose curls
Want to create flirty feminine hairstyle? Combine the classic bow with loose curls. A beautiful eight-figure butterfly will not only decorate them, but will not allow them to crumble and fall on their faces.

The bulk of the curls can be straight or wavy, strands used for work, it is necessary to pull the iron.
Comb the curls, divide them into a straight or oblique parting and fold back. Separate one by one right and left.
Connect them on the back of the head and secure with a rubber band. The wider the strands, the larger the bow will be.
Pulling the strands through the gum, leave the ends under it so that the main part forms a loop. Divide it into two parts, each issue in the form of eight halves.
This photo shows in detail the scheme of how to make a bow haircut from hair on long flowing curls:

And in this video, step by step it is told how to make a bow of loose hair on her head:
For convenience, the strands can be wound on a finger. Pierce both sides of the loop stealth, forming a bow. It should be placed neatly over loose curls.
Wrap the base of the tail with the edge of the strands so that the elastic is completely hidden. Secure the design with a pin. Fix hair lacquer strong fixation.

Want to make your curls more thick and beautiful? Learn how to make a miracle gelatin hair mask.
In this article you can see how to make a simple and practical hairstyle using a bagel.
Have you heard that castor oil is an excellent remedy for hair falling out? Here is the method of application and the mask recipe.
Who he does not fit
Despite its versatility, this simple and Fashionable styling is not for everyone. A bow on her head is not recommended for girls with very thin and unruly hair, or on too short strands or trimmed with a ladder, it will also be difficult to make an elegant bow.
Hairstyle can not be done and the owners curly, hard, can not be straightening curls.
Miniature ladies need to lay strands in a small, compact eight, not breaking proportions.
Laying decorate young, more adults need to carefully assess themselves in the mirror and make the most simple and discreet version of hair.

Having tried to make a butterfly of eight curls with your own hands, you will see: despite the spectacular view, she is very simple to perform. Having learned how to quickly and accurately design basic options, you can begin to invent unusual styling based on them.
High bow

This hairstyle is unique in that it is suitable for everyday life, and for the evening publication. This versatile styling of long hair is organically combined with any styles of clothing: jeans and sneakers, elegant suits and elegant dress.In addition, the bow does not need constant correction, if it is properly made.
So, to perform a high bow, you will need the following tools and materials:
- hair dryer for styling or iron,
- comb comb
- thick brush
- hairpins and hairpins,
- gum of different thickness
- styling mousse and hairspray.
Before starting to perform a romantic bow, you should wash your head, put mousse on wet strands and dry it with a hairdryer.
If the hair is thin and sparse, then they should be screwed up before styling to give the hairstyle volume. And curly and naughty strands - straighten ironing. By the way, a tall bow does not suit chubby girls, so we advise them to pick up other evening hairstyles for full ones.

Technology of performance of a high bow:
- Carefully comb the strands and collect them in a high horse's tail, which is fixed with a rubber band. For this you need to know how to make a beautiful tail. It should be noted that the curls should be perfectly combed and there should not be “cockerels” on the head.
- Take a second gum and clasp the tail in half. Thus, at the base of the gum will have a loop, and the free ends of the strands will hang on the forehead.
- The hair mass at the base of the tail is divided into two parts, and the free ends hanging on the forehead are thrown through the middle of the bow.
- The tips reattached back are fixed with stealth and hairpin. Long tips can be hidden under the base of the hairstyle.
- The resulting bow fix with varnish.

The bow looks beautiful with or without a bang. Stylish option: slanting long bangs to the side and a bow at the crown. You can read more about short slanting bangs here http://ilhair.ru/pricheski/strizhki/s-kosoj-chelkoj-sposobny-skryt-nedostatki-form-i-chert-lica.html tweak them curling. It will be very original and playful.
On loose hair

A bow can be made not only at the crown, but also at the bottom of the head: in combination with loose strands.
Hairstyles for teens for girls with a bow will create a romantic image.
Technology bow on loose curls:
- Clean and dried hair carefully combed.
- Separate one strand at the temples and lead them to the back of the head.
- Connect two strands behind the head and clasp them with an elastic band to make a tail. The thicker the strands will be, the longer the hairstyle will be.
- The second rubber band to clasp the tail so that you get a loop, as in the previous version. The longer the loop, the greater the bow. But one should not make an unnecessarily large bow: it will be ugly on loose curls.
- Divide the loop into two parts.
- Pin each part of the loop with barrettes on either side.
- Throw the free ends of the tail up - through the middle of the bow and gently fasten them invisible. Long strands hide under the hair.
- Release the bow from the pins, straighten it with your fingers, giving volume.
- Sprinkle with locking agent.
Loose curls can be twisted. Hairstyle for long twisted hair will give the image of tenderness and romance.

Step-by-step instruction
Having considered the two previous options, we can conclude that the base of the bow is the tail, divided in half. There is nothing difficult here, and any girl will be able to cope with this task.

But there is another method of making a stylish bow, with the help of additional rubber bands. Its technology is as follows:
- It is very good to comb a head of hair and then divide it into two parts: the front and the back using a horizontal parting. A bow will be made from the upper strands, and the lower ones will remain free.
- Divide the upper part in half and clasp each strand with an elastic band - behind the ears. So, it turned out two tails.
- Each tail to intercept another rubber band in the middle of the length of the curls. This is necessary in order to visually mark the length of each petal of the bow: they must be the same and even.
- Bend the first tail in half so that the gum at the base and in the middle of the contact. This loop to fix another rubber band. Thus, it turned out the first petal of the bow.
- Do the same with the second tail.
- The free ends of the tails hide under the hair and fix it invisible.

The remaining lower hair to wind the curling iron in the form of spirals. At the temples, you can also release a few thin strands andtwist them up. Hairstyles for graduation in kindergarten with a bow are popular, because they allow you to create an image of a little princess.
The result is a very gentle and romantic composition. This hairstyle is perfect for a young lady in case of her first ball!

If you want to choose a hairstyle with oblique bangs on medium hair, we recommend reading our article
If you want to learn more about the torn ladder haircut, we advise you to read our article http://ilhair.ru/pricheski/strizhki/rvanaya-klassika-stilya-i-unikalnosti.html
There are several helpful tips for doing the bow:
- Performing a loop of their tail, do not make it too long, otherwise the “petal” will simply disintegrate.
- The middle of the bow can be straightened with both straight strands and a pigtail woven from their remaining tips. It will be very original. This composition will become more complex and rich.
- A low bow should not be located at the very neck. Its optimal location is slightly lower than the nape.
- Using hairpins and hairpins, you should select them by hair color. But if they play the role of decors, then the color scheme should harmoniously coincide and contrast with natural strands.
- The finished hairdressing composition should be securely fixed with varnish, especially for important events.
- Do not daily make a "butterfly" on his head. After all, regular hair tightening in the tail, makes curls fragile and thin.
- Bow does not go to the owners of round and square faces. In extreme cases, the wrong proportions can be corrected with asymmetric bangs and loose strands at the temples.
- Although this hairstyle is considered universal, it will look at least strange on middle-aged women. Therefore, it is better to prefer a playful bow to young and young ladies.
So, a romantic bow can be made with different variations. Make this hairstyle quick and easy. The main thing: the hairstyle should carry its owner a good mood and confidence. Hair bow is sexy, practical and fashionable!
Styling Features

Feel free to choose this beautiful styling if:
- you are ready to experiment,
- You do not mind the increased attention to your person,
- your curls reach at least to the shoulders.
Hairstyle benefits
- very quickly you can create an original image
- no special skills and sophisticated hairdressing devices are required,
- with such styling you make a splash in any society,
- Bow styling is suitable for different face shapes,
- adding curled curls or decorative ornaments, it is easy to create an option for a holiday,
- hairstyle goes to dark-haired girls and bright blondes, brown-haired women and beauties with fiery red hair,
- whether you are wearing a bang or not,
- a bow of different sizes can be made anywhere: on the crown or on the back of the head, behind, on the side, even on the braid,
- placing an unusual detail in a different zone, you will get a completely new image.
Preparatory stage
Step by step:
- wash the hair, dry the strands well,
- weak, sparse hair slightly curl with ordinary or heated hair rollers,
- you can use curling iron
- Your task is to add extra volume of loose hair,
- carefully comb the strands, make sure that there are no tangles left
- foam, mousse for styling or lacquer strong fixation at the stage of creating a bow is not worth using. Clumpy strands are not suitable for this hairstyle,
- in some cases, it is necessary to add volume to the strands around the forehead or on top of the head. Recall how to do stuff, apply this method to create the effect of thick hair. Do not comb the section from which the bow will be formed.
Useful tips:
- with regular facial features, delicate skin, choose a smooth styling with a bow on the side or in the back of the head,
- extravagant hairstyle is easy to create, securing a bow on top. Juicy makeup will complement the memorable image.
Basic hairstyle scheme


How to braid a bow of hair? Act correctly:
- decide where you will be doing the bow
- comb the prepared strands, collect the tail from the whole mass of hair,
- create a bundle with a tip that is not drawn. Do this at the last turn of the gum,
- the beam should be in the place where you will form a bow,
- divide the resulting bundle into two equal parts. The more accurately you separate the details of the future “accessory”, the smoother the bow will come out,
- take a strand peeking out from under the gum. Close the hair of the place of separation, throwing a strand over the middle,
- securely fix the back hair with invisible hair or hairpins,
- correct hair, smooth hair with gel or sprinkle with varnish.
The step-by-step instructions from the photo show that there is nothing difficult in creating an unusual bow. One has only to practice a few times, and you will easily make a bow of a regular bunch of hair.
 See options for wedding hairstyles with a diadem for long hair.
How to use powder to lighten hair? The answer is on this page.
Follow the link http://jvolosy.com/sredstva/travy/kora-duba.html for instructions on how to use oak bark for hair.
Variant on the back of the head

- Well comb strands, collect the tail on the back of the head,
- leave in the middle one strand about 2 cm wide (you will need it to create a “jumper”),
- divide hair into two identical parts. Now you need to give volume to each side,
- if you have 20 minutes left, use conventional or electric curlers. If there is not enough time, use the curling
- wait for the curls to cool, slightly brush each side,
- twist the left and right side of the curled strands towards the face so that the halves of the bow are formed,
- Fix your hair well: use stealth. For fidelity in the middle, you can additionally use a pin
- you got a kind of "bow-butterfly"
- be sure to sprinkle the styling with a strong varnish,
- Complete the installation with decorative studs with rhinestones, flowers or beads on the ends. You can use an elegant hoop.
A bow on loose hair

- clean the curls divided by a horizontal parting into two parts,
- you turn the bottom strands into soft curls, from the top you need to create a nice bow,
- top up, giving extra volume, smooth with a soft brush,
- collect the upper part in the tail, from the gum reach the ring - the basis for the bow,
- divide the ring into two equal parts, as in the first version, pass the tips through the middle,
- from hair also make a membrane for a bow, fasten at the bottom with pins or stealth,
- curl up loose under the original bow curling curling
- everything, the magnificent hairdress-bow is ready.
Secret Tips:
- This option is perfect for a prom or a romantic date. The longer the curled strands, the more impressive looks hairstyle,
- Magic curlers Magic Leverage will help to create beautiful Hollywood curls. Take about an hour to perm and lay. The result will be amazing
- This hairstyle is suitable for a little fashionista. If you have a daughter, make the original styling for a gala evening at a school or preschool. The hairstyle of the young “princess” will surely be appreciated by girlfriends and creative young mothers.

Take note:
- any girl can create an original bow of strands. After a few workouts, you will notice that you have completed the task in literally 10 minutes,
- make an interesting styling girlfriend or sister. So you will understand how to act,
- when creating a bow on the back of your head for convenience, place a second mirror at a convenient distance. You can understand how your haircut looks like from behind,
- Perhaps you have a trill? Three mirrors are ideal for a beginner who learns the basics of creating an unusual strand of strands. The review from all directions will be maximum.
What is needed for laying the "bow"?
 As with any hairstyle, a bow of hair requires the use of certain tools and tools. Among them:
- comb with frequent teeth
- massage comb,
- thin elastic in hair color,
- invisible hair color
- gel, mousse or styling wax,
- lacquer strong fixation.
You may also need:
- hair straightener,
- multistyler with nozzle "corrugation"
- thermal protection for hair,
- curling iron
Bow on top
This hairstyle will suit a brave lady and little girls. The bow lies on the highest point of the head.

It is done very simply:
- First you need to thoroughly wash your hair and dry them well with a hairdryer.
- When the hair has cooled down, apply gel, wax or mousse on it. Distribute the tool evenly over the entire length.
- Next you need to comb your hair with a massage comb.
Bow on the head
This hairstyle is more strict and well suited for the office.
Her performance is not much different from the previous version:
- Hair should be clean and dry.
- Hair styling is applied to the hair.
- It is necessary to comb the hair with a massage comb, only now from the forehead to the back of the head and collect the tail on the back of the head, without pulling the end of the hair completely.
- The resulting loop is divided into two equal parts. Each part is fixed invisible in different directions.
- The remaining strand of hair is stretched between the loops and secured.
- Hairstyle fixed varnish.

This algorithm performs the basic hairstyle. It can be varied by some elements. You can perform bouffant at the crown and only then form a bow. You can also release two strands of face and curl them with a large curling iron.
An interesting look is obtained if you walk through all the hair with a hairstyle styler before performing the hairstyle, the basal volume can also be created with the help of this nozzle and then not comb it.
Bow on loose hair
This hairstyle from a number of evening and festive. It will suit both an adult girl and a little girl.
And the main advantage of it is that it can be done independently and quickly:
- As in any case, the hair should be perfectly clean and well dried.
- In order for the hairstyle to be held, a styling agent is applied. For this hairstyle, mousse or foam is preferred.
- Then it is necessary to apply a heat-protective agent on the hair and comb them well with a massage comb.
- Hair should be divided into two parts by a horizontal parting.
- The top of the need to stab so that it does not interfere.
- Screw the bottom of the curling or curlers.

Interesting fact! If you twist the hair on the curling iron, then often they unwind earlier than necessary. This is due to the fact that hot hair is lowered and aligned under its own weight even in the process of laying.
In order to avoid this, the strand curled by the curling iron needs to be fixed with an invisible ring in the shape that it turned out during the styling process, and wait until the hair has cooled down. Cold hair takes the form worse, and the hairstyle will last longer.

Such a package has many options. A small bow can be done from the side or even from the front.

Also the hairstyle from a large number of bows which will frame curls behind will be pertinent.

If you show a little imagination, you can create a lot of original hairstyles using an ordinary hair bow.