Let's follow step by step how to implement it.
Step 1. Divide the head in two parts in equal part.
Step 2. From each do the tail and tighten the rubber band.
Step 3. If the hair is thin or does not have sufficient volume, then it is better to comb the tails. So the bunches will look much bigger and more attractive.
Step 4. Next, twist the tails into a light braid and lay around its base.
Step 5. Do not forget to fasten stealth or stud and for reliability varnish.
This option can be considered both with bangs and without it. Romantically look two bundles with loose strands of face. Photos show such images.
Bundles - ears
Such a fun version of the bundles is not longer than the previous one.
Step 1. We start the same way with parting and tailing.
Step 2. The last time we pull the tail through the gum is not until the end, leaving the bun, as shown in the photo.
Step 3. Beautifully straighten it with a fan and attach it to the head with the ends using an invisible hairpin.
Step 4. The remaining tails are wrapped around two beams - ears and fastened.
Weaves with weaving
The bunches made of braids look no less beautiful. This hairstyle is performed by analogy with previous styling. That is, starting with the tails. And then of them weave braids and twist into bundles. Charming cones are obtained. On long hair to perform such a hair is very simple. To give the beams volume, it is possible to fluff the spit slightly before twisting. And to place them below or above, will depend only on your desire.
There is another version of the beams - weaving all over the head, turning into bunches, usually French braids or backdrops.
Two buns in the style of Tumblr (tambler) gerl on loose hair
Hairstyles tumbler (tambler) are very popular among young girls who are not averse to stand out from the crowd and come up with their own style. Hairstyle two bunches on the sides is embodied in the Tumblr style and is actively used by girls of different ages in combination with flowing hair and interesting coloring. Bundles are made in the same way as in the classic version, just use the strands on the face.
Original bundles
A very unusual way to place beams on the head is not on the sides, but on the top and bottom. For clarity, pay attention to the photo below.
Here, in contrast to the previous version, the hair should be perfectly smooth and combed back, and tufts should be made tight in the amount of two to three. The following video will demonstrate the step by step execution of this hairstyle.
Two buns in the format of children's hairstyles
Little women of fashion also appreciated stacking in two bunches. This hairstyle for girls is one of the most beloved. Moms do not hold fantasies for their implementation, which is confirmed by the photos shown below.
To make the bunches even and identical, you need to use special accessories - bagels. For children's hairstyles choose their small size. Bundles for girls are relevant for everyday life, held in kindergarten or school, and for holidays. In the latter case, it will be enough to make a bright accent with the help of a beloved daughter's hair clip.
At the end, watch the video on how to make the hair two bunches on the sides like that of Maria Wei.
Who are two beams for?
Hairstyle in the form of two beams goes to most girls, because of the mass of options, each of you will be able to choose the desired shape. And in order to facilitate the process, take note of a few important tips.
- Tip 1. Owners of an oval-shaped face and a long thin neck can afford all bunches - loose and taut, at the crown and nape.
- Tip 2. Visually lengthen a neck that is too short can be low tufts.
- Tip 3. With a not very big growth bun make bulk.You can arrange it on top and below.
- Tip 4. Girls with a long or square face is better not to make bunches high - place them lower.
Cute Panda Style Bundles
These round bunches are something like a panda. They are very popular among modern fashionistas, because they can be combined with both jeans and a dress.
1. Make a straight parting.
2. Gather the strands in your hand, lift it to the top of the head and twist it into a tight bundle holding it with your hand at the base. To bundles were more, comb strand.

3. Make the flagellum bulky, stretching it with your hands in a downward direction.
4. Twist the bundle in a circle, putting it in a light air bundle.
5. Secure the structure with studs.

6. Carefully straighten the bun.
7. At the face, slightly pull a pair of thin curls, giving the hairstyle the effect of negligence.

8. Repeat the procedure with the second part of the hair. Make sure that the beams are located on the same level.
9. Fix styling varnish.


Informal bunches
2 gulki on the head can be done both for girls and for those over 30. This stylish option is useful for walking, meeting with friends, parties or even for work. It should be combined with a narrow classic skirt and short leather jacket.
- Comb well by making the center parting.
- Tie two tails on the back of the head.
- Right twist in the bundle.
- Wrap a bunch so that the tip looked down. Secure with studs.
- Repeat the procedure with the left tail.
- Spread the tips of the bunches.
- Let off a couple of thin curls on the face.
- Sprinkle styling varnish.

Elegant eight
To create such a romantic hairstyle you do not have to spend a lot of time and effort. It can be done in the morning, going to work. The image will be elegant, feminine and romantic.
- Part on the side.
- On the right, near the face, separate the hair strand. If desired, leave a pair of curls for bangs.
- Twist it into a bundle.
- Gradually add loose hair to it, located on the right side of the parting.
- Reaching the base of the neck, lay the bundle in a bun. Secure it with a stud.
- Repeat the procedure with the left half strand. Bundles must converge with each other, forming the number eight.
- Sprinkle styling varnish.

This easy styling has no age limit - it can be done both for young girls and teenage girls. The optimal hair length is up to the shoulders or across the shoulder blade.
- Parting straight.
- Separate a small part of the hair near the forehead.
- Tie two tails down.
- Tie another elastic in the middle.
- Fold tails in half and tie again.
- Wrap the resulting bundles with free strands. Hide the tips inside and gently stab the invisible or studs.

Watch the video on how to make the most simple and popular hairstyle - two bunches on the sides:
Perfect for long and obedient hair. Make this hairstyle you will not be difficult. In addition, the accessories need only a brush, studs and a pair of gum.
- Comb it all back. Near the temple, select a small section of hair and twist the tourniquet, gradually adding half of the hair.
- Lay the harness in a loose ring, twisting it counterclockwise. Secure with studs.
- Slightly pull the edges to give the hair pomp.
- Perform the whole process on the other side of the face, putting the ring mirror. Also securely fasten.

Openwork "cones"
"Cones" on the head look very elegant due to the lace weaving. Having made them for a celebration, you will be the brightest and most chic lady.
- Comb on the center parting.
- Tie two smooth tails, leaving a small strand of hair on one side.
- Braid each tail into a fishtail pigtail. Tie the tips with thin silicone elastics.
- Lay the scythe in the bun and securely fasten.
- Straighten the bundles with your hands.
- From the remaining hair, you need to braid a pigtail - either a tight fishtail or a French dragon.
- Lay it in the direction of the bun, hide the tip in the middle and slaughter it with invisibility.

How to make two buns on the sides of loose hair? This most fashionable trend can be easily made at home, having spent a minimum of energy.
1. Comb to the center parting.
2. On one side (side, in the area of the crown), separate the hair strand. Tie it in a tail and braid a pigtail. Tie the tip too.
3. Twist it in the bun and securely pinned.
4. Perform the whole process on the other side of the parting.
5. Gently comb the rest of the hair.

Bundles in the form of goat horns
Fun, provocatively, cute - this is how they say about the hairstyle of 2 bunches made according to the type of horns. This is the best choice for not thick hair.
1. Comb to the center parting.
2. Strand the forehead near your forehead.

3. Tie two tails, placing them on the crown, as shown in the photo. Choose gum wide enough and knit them higher, because they will become the basis for our future "horns."

4. Form two bunches, spinning the hair around the base of the tails in a clockwise direction.

5. Gently fasten the horns with a pair of invisible animals.

6. Spray your hair with lacquer.

See also: How to make two beams on each side in two minutes to itself (video)
Hairstyle “two bunches. How to make a beam on the head: simple ways.
It would seem that stylists have nothing to surprise us, because all the hairstyles have long been invented and known. But sometimes quite unexpected, but very practical solutions are included. It is because of their convenience, simplicity and stylish appearance that they become popular. These include hahn hairstyle. Recently, we often meet on the streets of girls, we see on the photo and video of stars with a hun hair style - the lower part of the hair is loose, and the upper one is collected in a small bunch on the crown. Today it is a real trend among fashionable everyday hairstyles that you can easily do with your own hands.
What does a han or half-bun look like
Why a hairstyle with half-open curls and strand twisted at the top of the head is called khan? It’s not because with her you will become like Genghis Khan. Just Hun is the abbreviated name half-bun, which translates as half-beam or half a beam.

This style has many advantages, in addition to the stylish appearance:
- Ease of implementation - even a young fashionista and anyone far from hairdressing can make such a half-bureau on her head.
- Practicality - the hair collected from the face on the front sight does not interfere, does not climb into the eyes in the wind, and it is generally very convenient.
- Universal option - this is a great option for a variety of cases. A half-shot is appropriate just for a walk, on the beach, in a cafe, cinema, in a nightclub at a party and even at work, if the dress code allows.
- Uni - the versatility of the khan laying is also in the fact that it is suitable for all both long-haired men and women, both young and aged people.
- Many options - on the basis of this styling, you can make a variety of hairstyles: neat classic, sloppy, slightly disheveled, with a high or lower beam, or loop, with straight hair or curls, with bright details and accessories, with the addition of braids, flagella and other elements .

Male Han - Japanese Samurai
The fact that Hun can be not only a female hairstyle, but also can be seen from her history. 5 centuries ago, the Japanese of all genders actively made such a bunch on their heads. And the samurai loved her no less for its practicality.

Picked up this idea and also actively use it. Half a man can make any man with hair slightly longer than average. If you have long hair on top, this hairstyle is perfect for you. It is also suitable for men with long and medium haircuts.

With this fashionable hairstyle, you can easily play sports and lead an active lifestyle.

Hun hair for women
The female version of Khan looks very fashionable at any hair length. Especially if performed on slightly ruffled careless waves.

You can do hun on short hair up to and from the ear. It is better if the strands are straight and styling neat.

This hairstyle looks good on medium length haircut type and square. You can make sloppy waves, light curls or perfectly straight strands.
But a bob with a strong angle will look bad in laying.

On long hair, you can make a khan's hairstyle in a variety of ways: twist the bun on the top of the crown or a little lower. Twist the hair with a bagel or flagellum, or push them through the elastic not to the end, to make a loop.
Also, long strands allow you to experiment with decorative elements. For example, you can braid thin braids in the thick of loose hair, or make Greek braids on the temples or plaits leading to. And you can even make two such half shoes - you get a funny cheerful styling.

You should not use special half buns, donuts or donuts for hair.

You can use different accessories for decoration:
- Bandage on the forehead.
- Studs with stones.
- Beautiful narrow gum.
- The bezel.
- Tape or leather band-bandage.
How to make a hun hairstyle with your own hands

Spin half bun on the head is very simple:
- Comb your hair.
- Collect the upper part in the tail with a thin elastic band.
- Straighten the strands on the crown with your fingers, slightly pulling them upward so that the bundle is not too tight, but it is volumetric and free.
- You can comb a little strands in the tail, or leave it as it is, depending on what effect you want to get.
- Leave a loose thin strand out of the tail; we will wrap the elastic around it.
- Now twist the tail. Free or tighter as you like.
- Hide the tip of the beam under the gum or secure stealth.
- Wrap the left thin strand around the base of the Khan several times and fasten the tip.
- Loose hair can be straightened with an iron, slightly curled with waves, or whipped with your fingers for a negligent effect.

To create a bunch of Han, you need quite a bit of time - a maximum of 5 minutes. And ultra fashionable hairstyle is ready. Until new meetings.
The bundle, once associated only with ballet and strict teacher hair, not so long ago, tightly entered the youth and not only fashion: it is an extremely fast, comfortable and stylish hairstyle. However, it can be very diverse. But even when creating it, you need to take into account quite a few factors: however, if you know on your head, the rest of its variations will be performed automatically by the hands.
FAST ARTICLE NAVIGATION
Features create a bulk beam on short hair
Most often, if a girl's curls barely reach the shoulders, it is very difficult to make a magnificent bun. In addition, it is almost impossible to lay the strands in such a way that the hairstyle looks neat and elegant: mostly sloppy bunches remain relevant, as well as their French counterparts - various shells. To give volume do tupiku (one-sided, inner bouffant) or use linings. Examples of hairstyles with pads are presented in the photo.
Consider how to make a bunch of hair yourself:
- Collect the hair in the tail, located where the beam should be. Most often it is the crown or occipital zone, but asymmetrical (shifted to the side) tufts are no less attractive. Secure them with a rubber band. In this case, its size does not matter: on the contrary, a thick elastic band may be preferable if it is possible to block it with hair - this is will add volume hairstyle
- Roll the entire mass of hair into a braid or braid into a braid, which is recommended to pull each link slightly to the side. Wrap the base of the tail with this, hide the tip inwards, securing it with the help of the invisible. To hide it completely, choose a length shorter than the volume of the future hairstyle. The stages of creating hairstyles are shown in the photo.
The technique of creating a beam for short hair is presented in the video:
By this principle, beams are performed on any hair, but most often it is used for short strands. However, not only he: there is a technique of French styling, which also allows you to work with curls up to the shoulders.

Learning to build a beam on the head according to the French method:
- Divide the entire hair mass into two parts by a horizontal parting at the level of the upper tip of the ears. Grasp the lower zone temporarily with a clip, and nibble the top strand after the strand at the root, then spray it with varnish.
- Assemble the upper part at the level of the parting, smooth the outer side, without eliminating the resulting volume, fix it with a small thin rubber band, as shown in the photo below.
- Remove from the bottom of the clamp, also scoop it from the inside, connect it with the upper tail and twist the ends inward, forming a careless vertical "shell". In the place of the seam, add hairpins that will keep the hairstyle.
The same technique can be performed horizontally. The main point of this technology - tracking pile, which in the process of smoothing the outer side should not be eliminated.
Volume bundle on thin hair with a fleece
Tupirovka (the one-sided bouffant) can be used and on long curls if they lack density . Such a method will not harm if done correctly: the strand should be pulled off, after which the comb should be moved to the root, going upward with a kind of "steps". If everything was done correctly, combing the strand back will be quite simple.

So, in order to understand how to make a bunch of hair with the creation of the illusion of natural density, you will need to do the following:
- Bleed the entire mass of hair with wide strands all the way to the tips. Carefully collect the curls in the tail and smooth the front side. Do not overtighten the tail too much - this will kill the emerging volume.
- Now break the entire free canvas into several parts, do the tumbling of each of them again, then sprinkle with varnish and twist into a loose harness. Wrap the base of the tail with these harnesses, hide the tips and secure with stealth. You should have a luxurious, voluminous knot of hair, as in the photo.

In this procedure, there are several nuances that can be decisive in relation to the final result:
- Wash your hair before creating a hairstyle without air conditioning or mask . If the shampoo requires an emollient after it, use a tip oil or a moisturizing spray for length.
- Dry your hair with your head leaning forward . This technique will create a natural basal volume.
Features recreating the gulki on thin strands can be seen in the video:
How to make a bun with a bagel?
This is one of the most common methods used by professionals, and allows you to make a magnificent beam on the head. in the absence of hair density .
For work, you need a special bagel, which can be purchased at a hairdresser or by yourself. It is usually based on a well-shaped material, similar to that used in dishwashing sponges.
In size, it resembles a simple thick rubber band, but the inside diameter should be a little more than the girth of the knotted tail.

If you did not succeed in buying a bagel, you can build it yourself by taking a simple thick sock for this: wool, terry, acrylic. It is desirable that he was long and unnecessary, because he necessarily cuts a cape. You should have a pipe (as in the photo) that turns out and twists until you get a volume circle.

It is possible to form a device for the beam from any other fabric, but then you will need a foam base from which the circle with the eliminated center is cut. Then it is covered with a selected fabric so that the hair does not cling to the foam.
In order to make fine hair using such an accessory, besides it you will need a regular elastic band, as well as several hairpins and stealth, weak fixing varnish, moisturizing spray, comb with natural bristles.
It is created as follows:
- Build hair in the tail, secure with a rubber band. If the hairstyle should be neat, with a smooth head, then it is better to use an elastic band with hooks: it will allow to avoid “roosters”, and, moreover, it will reliably fix the strands.
- Put a donut on top of the gum (as shown in the photo instructions) lowering it to the very base of the tail. Then smooth the loose mass of hair with natural nap and sprinkle with any moisturizing spray - this will help to reduce the degree of electrification of the curls during their styling.
- A comb with a long sharp tip (spoke) should be divided into strands so that they fall down the bagel, blocking it completely. If necessary, the hair again smoothed.
- At the very base of the tail, place a pair of Invisibles, then wind the ends under the bagel and hook them with studs through the Invisibles. At the end sprinkle hair with lacquer.
You can do two different ways, they are shown in the photo.


Watch the video and learn to build a styling with a sock:
The same principle can be created from hair. To do this, before work, apply a little skin over the hair and squeeze the strands in your hands several times. Allow them to dry and collect in the tail, then perform all the steps described, without smoothing the curls. As a result, you get a spectacular hairstyle, as in the photo.

Tie a careless bundle of curls will teach the video:
It is not necessary to immediately lower the bagel to the base of the tail: you can stop at its upper third, and then begin to twist the accessory and hair, thereby reducing it.
This technique is relevant for very long hair, the ends of which can not be hidden in the above method.

In addition to the technologies discussed above, there are other methods for creating a bulk beam. For example, in hairdressing shops you can find special hairpins of the “sophist-twist” or “hairagami”, which need to be curled into curls to get the intended hairstyle. Also a good effect gives pre-curling hair.
Finally, a video about 5 ways to create hair:
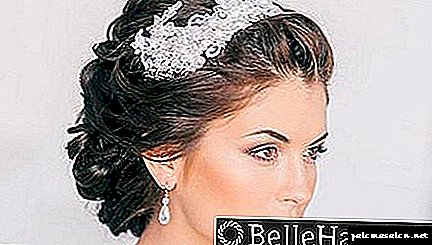
Hairstyle gulka will always remain relevant and very popular with women of any age. This hairstyle leaves open neck, which allows you to create a flirty, sexy, and at the same time elegant and noble image. It directly depends on the choice of the shape, size and location of the bun on the head. There is a great variety of gulek (harnesses, bump, knots), and even more ways to create them. You will get a refined and gallant image if you choose a neatly made whip on the crown in the middle or at the bottom of the head, without using fancy decorations. A playful and flirtatious image will help create a bun at the side of the crown, at the same time braided two buns, which are decorated with bows, laces, etc.
At first glance, the bun is a completely uncomplicated hairstyle, but not every lady can do it herself. In this article we will try to explain to you, dear ladies, in an accessible and step-by-step manner, how beautiful it is to make a bun.
1. Like Ariana Grande

Singer Ariana Grande with her light hand made this hairstyle fashionable. Ariana wears bunches with loose hair, dividing them into a straight parting. It looks very playful and feminine, this hairstyle immediately makes the image more youthful.

To make the styling even more original, divide the hair into a zigzag parting and tie two bunches higher!
3. Most carelessly

Careless bunches - the main trend of this summer. It is better not to comb your hair before doing this styling. Bundles secure the usual rubber band or studs, slightly combing them for volume.

In the style of Japanese anime: two bunches look fabulous, if you do them on hair painted in an unusual color.
Two buns of hair on the sides
Do you want to look provocative and make a lot of good smiles around? Make two buns on the sides. This hairstyle looks good on adult women and young girls.
Hairstyles with buns will go to everyone, because they have a lot of variations. Therefore, each girl will choose a styling for the soul.
- With a graceful long neck and an oval face, a variety of bunches look good. They are mounted on the back of the head. The modern version is not licked gulki, but slightly negligent,
- owners of short neck are recommended to perform low-fixed beams. This will visually lengthen the neck,
- short women should do volumetric beams fixed at the crown or slightly lower,
- high women fit a highly fixed beam. Only not too lush, as it will make an imbalance in the image. Two beams on each side are attached tightly, the use of jewelry and accessories is welcome:
- girls with a square or oblong face high beams are not recommended. It is better to make a lump on the back of his head,
- hide minor flaws appearance will help fantasy. For example, you can make two lush cones on the sides and release loose locks along the face.
A simple lump on the head will be able to twist in just a few seconds. That is the reason for its high popularity. Also build a bun can be for special occasions, parties and even weddings.
Features create hair
Hair with two buns on the sides has many variations. You can use all the strands or combine with loose hair. Make it better on medium or long hair.
You will need a comb, thin rezinochki, preferably coinciding with the color of the hair, invisible, as well as foam and varnish.
- Wash hair and blow dry your hair. If they are naturally curly, smooth them with a flat iron.
- Divide the strands into a smooth parting.
- Lift the hair of one half and collect them on the crown in the tail. Secure with a rubber band.
- Apply the foam on the tail, distribute the tool over the entire length and begin to turn the bun.
- Twisting, wind around the gum and secure stealth.
- Do the same with the strands of the second half of the head.
- Sprinkle design varnish.
There is another option, how to make cones on the sides: bunches based on braids. It is necessary to braid pigtails in the usual way, pulling a little strand on the sides. Then twist the sides and secure with studs.
Beautiful lush gulki turn out on curly curls. There is even no need to use varnish. They turn out slightly disheveled, just in accordance with modern trends.
Hairstyles
On long strands it will look beautiful laying in the form of the original cones on one side. This hairstyle will suit any style, and its quick performance will help out in difficult times.
Gulka can be built for any occasion: working weekdays, active rest, romantic date. Hair will be carefully collected and will not interfere with a great time.
- Beautiful bun is performed using a special roller donut. Long hair is first collected in the tail at the top, and only then wound on a roller. Some girls use a sock trimmed around the fingers.
- On the curls of medium length, it will turn out to make a beautiful bun, not at the crown, but in the neck area. You can let go of the strands for wrapping the beam, and then fasten them with pins.
- Looks great everyday beam. The tail is pre-combed, then turns in a spiral and fastens with pins. If you release the sides of the strands, you get a careless hairstyle with a fluffy bun.
- The French version of the gulka - shell is originally. To create it, hair is sprayed, then the upper part of the strands is twisted into a bundle and fixed with hairpins. From the bottom of the tail is done and also fixed.
- But an unusual version of hair: curls are collected in the tail at the top or the back of the head.Then the strands are divided into several parts, each of which is twisted into a bundle. All flagella are wound around the tail and fastened with pins.
- Sishechka with scythes in the Greek style. You can twist a bun of a pigtail or a bulk knob by twisting it into thin pigtails.
- Glamor bunches. They are made on the top of the sides, and the bottom is left flowing hair loose.
- Malvinka. Part of the hair is removed from the face and tied in the back of the bun or bundle. The remaining curls remain loose.
And how do you hairstyle a bunch of long hair and two bunches.


As you can see, even the classic version of the bumps is performed differently. For example, you can fix the beam at the crown, nape, or almost at the base of the neck.
Today, high beams are more popular. It looks very original one bunch on the side or two on the sides.
If you want to create a careless bundle, do not use styling products. Sometimes even a comb is not required.
Just gently smooth the hair with your fingers and blow dry with a hair dryer without a comb. Then collect the bundle with your hands, without worrying about its smoothness and accuracy.
If you need a licked version, before laying the strands, apply an iron and apply a modeling gel on them. Collecting hair in the bun, make sure that the strands never get out of the hair. To complete the glossy image, wrap a bundle of previously selected strand.
Use of jewelry
Various jewelry will help to diversify a hairdress, will refresh an image. For example:
- beautiful satin ribbons, headbands, studs decorated with rhinestones,
- The bezel will advantageously complement the bump. In addition to the aesthetic function, it carries a practical one - it will help to keep the hairstyle in its original form longer. After all, unruly strands grow in front, which constantly strive to jump out,
- thin silk scarf is the perfect decoration for the bun. It will replace the headdress, add the image of femininity.
Jewelry is good, but the main thing here is not to overdo it. After all, the gullet itself looks great.
Professional help

If you need a bun for a solemn, important occasion, sign up as a stylist. The specialist will help you choose the best option for bumps for each type of person. Get an original hairstyle, perfectly in harmony with the image.
A similar hairstyle can be done in the salon with an experienced master. Price depends on the city.
Hairstyle "two bunches"

Now in a trend not only naturalness and carelessness, but also romance, youth and mischief. Therefore, the hairstyle “two bunches” quickly won the ardent love of many women. Among the fans of this funny and easy styling are such stars as Miley Cyrus, Cara Delevingne, Ariana Grande, Reese Witherspoon, Katy Perry and Margot Robbie. This popularity is not surprising, because the "horns" look great on the hair of any length and color, suitable for different images and styles.
Types of fashionable hairstyle "two beams on each side"
The presented way to lay strands is universal, since it can be performed in several techniques:
- Horns with weaving. The bunches look very beautiful and spectacular if you arrange them with 2 French braids on the back of your head. Laying difficult, but spent time is worth it.
- Hairstyle with two bunches on the head and flowing hair. This option looks feminine, gentle and playful at the same time. In addition, this method to make the "horns" is perfect for every day.
- Sloppy bunches. The main trend of the season in the style of casual. Slightly disheveled and sloppy "horns" are associated with freedom and youth, self-confidence and charming ease.
- Lush bunches. If you twist, slightly combed the strands and put them in 2 volume buns, you get a beautiful and even festive hairstyle, relevant to the celebrations.
- Low "horns". It is not necessary to twist bunches in the area of the crown, at the base of the neck, they also look great. Such styling is suitable as an evening option for going to the cinema, theater or restaurant.
- Bundles with loose strands. Creating an elegant and feminine image is easy if you leave a couple of curls on the face, especially if you have a haircut with a ladder or a cascade. With this hairstyle you can safely go on a date.
- "Horns" with straight bangs. Bundles look gorgeous in combination with the specified element of the haircut. In this case, it is important to make them as neat and round as possible, emphasizing the contrast with an even cut of the bangs.
- Spit bundles. Make this styling is very simple - to braid 2 simple braids and twist them into a bun. But the hairstyle looks very unusual and attracts attention.
- Tight "horns". Quite an interesting version of the beams. They are both strict, smooth and classic, without strands and volume, but still look playful.
- Bundles-loops. The easiest way to create "horns". No need to roll the hair in the crook, just fold it in half, fix with a small rubber band and straighten.


Who is the hairstyle of two beams?
Stylists argue that this installation is suitable for absolutely all women. You just need to choose for yourself the most harmonious versions of the beams, given the shape of the face, its features and features.
To hide the flaws will help bangs and loose strands, and you can emphasize the dignity, if you completely remove the hair up. It is important not to forget about the relevance of the "horns." Despite their versatility, a lady in a business suit such a set will not work.
How to make a hair "two bunches on the sides"?
"Horns" - a quick and easy way to put yourself in order and look amazing. Making them very easy:
- Clean combed hair divided in half.

- Collect one half of the strands on the top of the head and twist them in a loose harness, holding at the base.

- Give the "blank" volume, slightly pulling the hair down with your fingers.

- Twist the curl around the base. It is not necessary to turn the strand too much, the beam pomp should remain.

- Secure the design invisible.

- Spread the bun around the perimeter.

- Pull a few strands in front, creating a negligent effect.

- Repeat the steps described with the second half of the hair.

- Fix laying varnish.

- Smooth loose hair.


That's all! If you practice a little, styling will take no more than 5 minutes.

Are you tired of constantly wearing curled loose hair? Try to collect curls in a beautiful and fashionable bunch. The proposed article will introduce you to the varieties of this hairstyle and help you master one of the options for its implementation.

Do you have long hair, but all kinds of tails, weaving and braids are already tired? Be trendy and make a bunch! The proposed fresh material will teach you to create this installation in literally 5 minutes, and in the photo gallery you can choose the best version of the beam for any image.

Have you tried to make a high bun or an ultrafashionable half-hair with flowing hair? Our today's article describes a very simple way to create this trendy hairstyle and presents examples of its interesting varieties.

Surely you have already seen famous women with a beam or half-beam on the head. Want to look as stylish as Margot Robbie and Cara Delevingne? With our new article you can easily cope with this task. Here you will find many examples of beautiful beams and detailed instructions for creating styling.
How to make a bunch on the head?
Before you start creating a fashionable image (hairstyles including), each girl needs to learn how to follow the advice of specialists (stylists, designers):
• you need to take into account the full image: makeup, clothing, accessories, styling, etc.,
• it is better to create a hairstyle onnormal clean hairFor a sustainable effect, use fixatives: varnishes, gels, mousses and so forth, it is better for owners of smooth thin curls to use bouffant,
• do not create an image on wet or wet hair, it is difficult to work,
• choose a hairstyle according to your data: dFor tall girls with a swan neck, buns on the top of the head are not recommended, tall hair styles are perfect for short necks and / or short statues, volumetric hairstyles, etc. are not suitable for miniature beauties.
Contrary to conventional wisdom, such hairstyles can be built to any length of hair: short, medium or long hair. It looks most interesting if the hair has a modern color using ombre, boho or highlighting. It can be complemented by various decorating means, a hat (with fur, multicolor handmade ornament (for example, tricolor), a veil or a shawl with a rosette, a round yoke, etc.), for example.
How to make a bunch on the head with gum
Scrunchy is a unique tool for creating a beautiful image. Variants of its use is a huge choice, both in a single performance, and with the addition of auxiliary accessories, for example, hairpins. The simplest (classic), but elegant option is done like this (an ordinary vanilla toggle switch, based on the usual bun):
- all going to tail (height can be chosen at your discretion, but it is important that the tail is not tight), before the process, the hair must be well combed,
- taking curls by the tips you need wrap up all shovel around the base of the gum, slightly rolling strands,
- tips reliably fasten under the tail are invisible, and the whole bunch of studs around the entire circumference,
- pull out time of strands at the temple, so that they framed the oval of the face (you get a stylish, slightly untidy image),
- sticking outtips no need to dress up in a hairstyle, they give spice to the image,
- to make hair more bulk, use a pencil, with its help slightly loosen the result (this method will give slight negligence).
The main principle of operation, of course, is simplicity and lightness. For a start, you can practice creating ideas on a doll (for beginners) or watching videos on YouTube.
Make a sloppy modern wisp on your head
How to makeridiculous tousled bunch on headse? We offer a quick and uncomplicated option with a loop:
- collect a pile in the tail on the top (horse): in the first turn, thread it all, and in the second, do it not completely (to make a kind of loop) to make the hair look voluminous, before this procedure moisten the foam with a foam
- on the loop and the remaining tips, make easy bouffant (add carelessness, you can slightly rumpled with a pencil),
- fix the result with varnish.
Such grubby variations are great for the child (little girl) and for young people both for every day and for special occasions. Another option: an inverted bundle, done with a spiral or spring.
Bundle on the head with gum on medium hair
An original idea for creating hairstyles. It looks more elegant if you make it at the neck (can be on the side). The scheme is simple:
- Divide a pile into several strands (the more strands, the more original the result will look),
- each strand is divided into two more and scroll in different directions (make harnesses),
- tie knots (if the curls are short enough for one knot on each selected strand) of the created harness,
- fix the tips and hide stealth,
- repeat the procedure with all the strands.
You can create both perfect and vice versa - an imperfect image (stylish, sloppy). For the second, you need an ordinary pencil, with its help you need to slightly fluff the knots, make them careless.
How to make a volumetric beam on the head with a donut
The most common way to create a beam is a bagel (in the absence of a special rubber band with a sponge (donut or donut), you can replace it with a folded toe). The result is feminine, neat and lush:
- make the tail with a rubber band (upper or lower),
- put a splash into a bagel / sock,
- make a palm tree from the tail, pushing the donut towards the tips (not to the end),
- Spread the tips evenly around the entire circumference.
- wrap them under a bagel and scroll until you hide all the curls under the roller,
- put a rubber band on top of the construction in the color of the pile,
- Fix the contours with studs.
We will tell about how to make a bun on the head without a donut and a sock below.
Fashionable beam on the head: photo
Modern image can be created by myselfwithout the help of beauty salons. Many of the world’s screen stars have enjoyed many of the methods described. However, this is easily seen by looking at the photos of the results presented to your attention: here and the usual bunches (classic), and using bagels, studs, with French braids, etc., etc.
Types of beam on the head: how to do?
Hairstyles that can be done independently weight, you only need to choose the appropriate option:
- bunches on the side (one or two vanilla),
- with a French pigtail on the side or in the center,
- disheveled (messy, fluffy),
- bow
- released strands and without them, etc.
Some options we have already described, and some offer more to consider.
Two beams on the head on the sides
This unusual model also has two versions:can be done high, in the middle, or below the neck. To create a hairstyle, split the curls in half (the original looks asymmetric separation (lightning)), make the tails with an elastic band on each separated strand and create a unique design of the chosen model (babette or cool elongated horns, for example). Perfect sloppy option.
This appearance requires special details and clothing: the simplest options for newborns are enough booties and a dress, but for more adults you need to think about the general style: a beige tunic set with a fur collar and a shirt with an elegant round yoke at the front (autumn winter), vest with a wide belt or yellow border (or, for example, a prominent rectangle) under the classic pants, mohair jumpers and jacket, mini and maxi length skirts, tight-fitting dresses, etc.
Experts recommend creatingown projects(sketches of models) on the patterns, tailored to your image. Thus, it is possible to decorate an already existing wardrobe, just add leaves, roses (on the seams, gradient or along the entire length). But it is important to knowhow it should look right, then in the details do not get bust. This will help the ubiquitous Internet and master classes from designers' designers, which you can download for free pictures, location diagrams of details, etc.
High beam on the head: description
The tall version (standing beam) looks impressive under any circumstances, since it is a classic of the genre. To create it:
- Build a high tail on the gum,
- Split it in two parts
- wrap one in a bundle, simultaneously wrapping around the free strand upwards,
- fix and hide the tips (can be fixed with pins, a handkerchief, a veil, a net or with the help of invisible women on the top),
- the second strand in the same way, but in the opposite direction, lower down along the created spiral,
- secure and hide the tips.
It is unusual option - a transformerhe universal (if the second strand is not twisted, an elegant tail with a hair frame at the base is obtained). Both options are suitable for different occupations. The first is appropriate for active activities (sports performances, for example): rhythmic gymnastics, ballet (often prefer ballerinas) sectional fight dancing (twister, for example), etc. The second one has something in common with everyday activities: work in the office, for walks, etc.
If add accessories(hairpins, flowers, beads, stones, etc.), it becomes a great festive hairstyle option: to the wedding(it goes well with the bride's wedding attire, you can fasten it with a net to the veil style) to graduation party and just on an evening date for boyfriend. In the absence of the required length of the curls, you can create an image with the help of a laid-on wig (individual curls), it will also emphasize the individuality. Boys can add men's accessories.
How to make a beam on the head with flowing hair?
This image can be created mixing styles (combined style): selected option (this can be one bundle (back or side) or same two sideit would be more appropriate to make them match the basic hairstyle, for example, careless and chaotic) to make a mop of a piece (divided into two or three quarters), the rest left in free form. This hairstyle looks great and with and without bangsbesides, it is suitable for a man as a fashionable male hairstyle and for women / girls.
Can create stylish and creative image by adding interesting details: hairpins with roosters or bat, for example (children's and youth image, great for boys and girls). Or create a romantic image with Japanese(Chinese) sticksIn short, create exclusive hairstyles!
With the help of gum for long hair
Another interesting way: with French braid. It looks very impressive and is done quite simply:shovel is divided into two unequal parts, great part of the tail of the elastic band, from lesser weave a scythe across the head, the tips of the scythe lead around the elastic and fix. From the rest of the (collected in the tail) do bundle by the harness method.
Bundle on the head - how to make: video
We offer to review all of the above described clearly: video how to make a bun on the head with a rubber band on medium hair:
Interesting video idea for short hair (fashion idea - volume bump):
Video lesson without the use of a donut and sock:
A stylish idea in stages for a long head:
Video tutorial on loose hair:
Video idea shaggy hairstyles on his head:
Hair "Two bumps on the sides"


Hairstyle with two beams - universal. Horns can be made for any occasion, as well as for everyday life. You can create a styling with all the hair. The procedure takes very little time. Two beams on each side - always in fashion, comfortable and practical.
Although the hairstyle is very easy to perform, yet to create it you need to know some rules. With a long neck it is necessary to perform low beams. For short-growth girls, bunches with medium hair length will do, but with long hair they will look out of place.
In addition to bunches there is a hairstyle “Two bumps”, which also looks original.
Who are the bunches?
Hairstyle in the form of a beam is perfect for everyone, because it has more than 10 varieties. Each girl will find her original version.
- With a beautiful long neck and oval face, different types of beams are combined, including tight ones. They are attached at the top of the head. Negligent hairstyles are a great option.
- If the neck is short, then a low fixed tuft will help to eliminate the drawback. This will hide the flaws in appearance.
- For owners of medium height, it is better to choose puffy beams, fixed at the top and a little lower. This option is aesthetic.
- With high growth it is better to perform a high beam, but it is not necessary to make it lush, since the image will be inharmonious. Two beams need to be fixed tighter, and for decoration it is desirable to use additional details.
- With oblong and square face types, it is better not to make the beam high, it is better to place it slightly lower.
- To hide the shortcomings of appearance, you can use the various options for hair. For example, you can create “Two bumps” or release a few strands.
What to choose with long hair?
With long hair it will perfectly harmonize the styling in the form of an original bundle, which will lie beautifully on one side. It fits all styles of clothing, and its quick execution is useful at any moment. The hairstyle can be used for different occasions: for work and outdoor activities - hair will be carefully collected.
- The volume bundle can be attached at the top of the head. First of all, the tail is created, which is fastened with a “bagel”. After that, the hair must be secured with pins and varnish.
- In a similar way, you can create a fluffy bundle on curls of medium length. Only for this purpose it is desirable to fix the tail below. You can release the strands for wrapping the beam. Its secured with studs to complete the image.
- Looks great everyday bunch. It is necessary to make a pile in advance, and then twist the curls in a spiral, fasten with pins. Some strands can be straightened to create a casual hairstyle.
- Unusually looks the French version of the hairstyle or "Shell". The hair should be sprayed and then the top of the strands should be twisted into a bundle and fixed with hairpins. From the bottom you need to make a tail and also stab.
- Hairstyle with a beam can be done differently. It is necessary to tie curls at the back of the head or the crown. Hair should be divided into several strands, and create of them with harnesses. Then curls curl around the tail. Fix hair can be with the use of studs.
- A bunch of ballerina. The peculiarity of the hairstyle is the foam circle, which is hidden under the beam. Foam can be replaced with a rubber band. First, a ponytail is created, and then the hair should be smoothed. After that, the donut is put on the tail, and fixed with studs. Then the hair should be laid around the elastic, and the tips should be hidden under the hair. Laying is fixed with varnish.
- Option with braids. There is an original styling with braids. Bundles are free, bulky. Weaving will help create a Greek image. Hairstyles are great for everyday life and special occasions. The bundle is divided into strands. At the end of the braids are secured with pins.
- Glamorous First of all, you need to wash your hair, foam it, dry it and create volume with your hands. Hair should be twisted from the side and pinned with pins.
Salon services
You can perform haircut not only at home, but also in beauty salons. The specialist will be able to choose the styling by type of person.
Then get an original hairstyle that will be in harmony with the image.
These types of styling will be popular in the future. They are practical, comfortable and beautiful.
The most convenient way to do them with long hair. At any time, you can perform this beautiful and practical styling.
- http://thevolosy.ru/wp-content/uploads/2016/08/Dva_puchka_5_18050325.jpg
- http://thevolosy.ru/wp-content/uploads/2016/08/Dva_puchka_4_18050324.jpg
- http://thevolosy.ru/wp-content/uploads/2016/08/Dva_puchka_3_18050323.jpg
- http://thevolosy.ru/wp-content/uploads/2016/08/Dva_puchka_2_18050321.jpg
- http://thevolosy.ru/wp-content/uploads/2016/08/Dva_puchka_1_18050320.jpg
- http://thevolosy.ru/wp-content/uploads/2016/08/Dva_puchka_po_bokam_1_18050320.jpg
- http://thevolosy.ru/wp-content/uploads/2016/08/Dve_shishki_po_bokam_3_18050318.jpg
- http://thevolosy.ru/wp-content/uploads/2016/08/Dve_shishki_po_bokam_1_18050316.jpg
How to make two beams on each side?

Beauty in the life of a woman plays a huge role. In addition to the good data from nature, you always want the appearance to remain at the highest level. This applies to manicure, make-up, as well as stylish hairstyles. Not everyone can afford to pay for salon services, so she tries to create the perfect image at home.
How to collect the hair on the head depends primarily on the clothes, but also the place where the woman intends to go. But probably, I want to find a hairstyle that does not take much time, and is suitable for any occasion.
Recently, more and more often you can see, even on very famous women of show business, bunches of hair. It seems that to make them completely easy, and they are acceptable in almost every situation.
Who are the bunches on the sides?
Such a universal hairstyle can be made on hair of any length. It is believed that the beams are always in fashion, they are convenient and in everyday life, and on holidays, but the procedure for creating them takes a little time.
As to who would be suitable for the beams, and who would not, it must be said that they are suitable for absolutely everyone, only in different variations. Given the considerable number of varieties of similar hairstyles, each girl can choose for themselves the best option.
Despite the ease of implementation, they still require adherence to certain rules.To bundles fit the image of a woman, it is important to consider its general parameters. For those who have a long neck, bunches can be located on the back of the head or on the crown, tight and not very tight. With a short neck, it is better to fix the bundles lower.
With a high growth, it is better to do bunches on medium hair, since they will not look the best on a very long hair. In such cases, in addition to beams, you should pay attention to this hairstyle, like hair cones. Girls of medium height should create puffy buns on their heads, perhaps a little below the crown. So, the hairstyle will look aesthetically pleasing.
If the face is oblong or square, the beams need not be positioned very high. To hide any flaws in the exterior, you can use various accessories to the beams, release small strands of hair.
If this is the first time the girl decided on this version of her hair, it is recommended to try several ways to create it. For jewelry can be absolutely any accessory. The main thing is that it perfectly harmonizes and completes the image.
It is important that the hair is well combed, and the further tail is well fixed with a rubber band. After creating a bundle of hair, you need to fix it well with pins or other hairpins.
Very beautiful look bunches with flowing hair. For this, a smooth parting is done, and two small tails are collected from above. The curls on each of them are twisted into strands, folded with a bagel and fastened with pins or stealth.
The rest of the hair remains loose, which gives the image a special innocence and romance. It is quite convenient that the hair is collected from above, and below it develops beautifully.
Not less impressive look sloppy beams on the sides. Hair should be clean and dry. To facilitate the process of styling is to use hair foam. On the top two high tails are tied, and on the second turn of the elastic it is necessary to make a loop without stretching all the hair. The tips need a little tousle or comb. If necessary, the beams are fixed with lacquer.
An interesting option is to create beams, as the continuation of the French braids. You need to tilt your head down, and on each side (alternately) divide the hair into three parts. Starting to weave ordinary braids, with each step you need to add side free strands.
So, spikelets trail up to the top. At the end of the weaving, you can fix the hair with an inconspicuous rubber band, or immediately add curls from the top of the head, twist the harnesses, fold them into bunches. For fastening usually several hairpins are preferred.
For everyday hairstyles, especially in adolescence, low buns with pigtails are well suited. Separated hair, with even parted zigzag, woven into braids almost near the neck.
The resulting weave twisted into bunches behind the ears and secured with pins. If the preference is more given to lush beams, then the hair should be well combed and rolled into bagels, again using small barrettes.
Practical advice
If the bunches are made loosely, without strong tightening, it is good to leave several thin strands falling on the face.
Disheveled beams accept the presence of bangs, straight or asymmetric. Bands, hoops or even scarves can be used as decorative ornaments.
Bundles on the head very securely entrenched in the fashion of this summer. It is very important that their creation does not require a lot of time and special efforts, but in the end it turns out a light and stylish hairstyle.
Hairstyle two bunches: how to make the sides like Maria Wei and loose hair


Fashion loves to look back and return the most convenient and practical things, qualitatively modifying them. This also applies to two trendy hairstyles.
In 2017, Christian Dior, Antonia Marras, Marsheza made their models an old-fashioned new style.Someone added carelessness and an interesting parting, and someone - an original accessory.
gallery view photo
for you a casual look
unusual one
Laying two bunches is a universal way of styling strands, when the hair, separated by parting, is collected in the "horns" on the sides. There are more than 10 options for laying and assembling sheep: high-low, magnificently-tight, uniformly asymmetric, and much more.
Fashion trends and trends
There are several popular several options:
- low sloppy lambs with curls at the temple. Come out stylish and youth,
- hairstyle with 2 funny buns-buns on the head,
- buns laid with unusual parted in retrostyle. It turns out beautifully and gently.
Such styling can help highlight your strengths, hide flaws. Therefore, when selecting the height, parting, degree of accuracy "lamb" it is necessary to consider several factors. Among them are the shape of the face, the beauty of the neck, the structure of the hair.
- girls with an oval face shape and a swan neck will suit any variations of the “horns”. Especially beautiful look sloppy, with flowing hair.
- lengthen the neck low gulki.
- A hairstyle with 2 puffy tufts attached at the top of the head or a little lower will help you to look higher.
- tall girls fit tight "horns", mounted on the back of his head. It is also worth making accents for additional accessories.
- elongated and square face fit gulki, located low, add harmony.
Now look through the hairstyles with the hair to the side and the hairstyle low beam.
Myself a hairdresser
This hairstyle looks stylish and interesting. Especially if it is framed like that of the famous beauty blogger Maria Wei.
Make a masterpiece on the head can be 7-10 minutes. You will need mousse, varnish, medium fixation, rubber bands, pins or stealth, comb. Step-by-step instructions with photos help to make a beautiful styling.
- Wash the strands, dry them with a hairdryer, apply mousse or foam.
- With the help of a comb, make a parting, dividing the hair into two parts.
- Assemble each part into a tail, fix it with rubber bands at the required height.
- Then roll the hair with a cord, wrapping it around the elastic.
- The end of the harness lock stealth or studs.
- Repeat the procedure with the second tail.
- Spray the strands with varnish to last longer.
It will be interesting to know how to make a hairstyle from bunches on the sides in the form of "karalek" or braids. To do this, divide the tails into strands, twist them into tight bundles or form braids. Carefully lay the hair around the rubber bands, pin the hairpins, fix with varnish.
Varieties of the formation of horns
The variety of image with a bagel is great. Here are 11 of the most popular options.
- Collect bunches at the crown and completely remove the strands.
- To form bagels on the back of the head.
- Twist the "horns" at the top, and curls at the back to dissolve.
- Tight twist bagels.
- Carelessly twist lambs and fix.
- Make curvy bagels.
- Use when creating the image of various accessories and hairpins.
- Try to make an unusual parting - oblique or zigzag.
- With the help of crayons ottenit asymmetrically strands, then the image will be extravagant.
- Leave the curls in the face or release the bangs.
- To issue strands in the form of a braid. Get beautiful horns.
- If you have thick hair, you should try to make curvy lambs, they will look stylish.
What accessories will give style?
How to make styling unique? It is enough to decorate hair with an accessory.
On bunches, hairpins with flowers, headbands, and headbands in Kazanshi styles look great. A chiffon scarf will add elegance to the image, a cord woven into a hairstyle will add excitement.
For solemn occasions, you can use the original designer jewelry. Photo proves you that such an image is really fashionable.
The hairstyle of the two side bunches is light in design. It can be done for the latest image.But, if you need a solemn version, it is best to ask for help from a stylist.
How long stacking lasts
Styling using foam and varnish will last all day. Therefore, you can visit the salon in the morning, even if the event is scheduled for the evening.
Back to content
Two beams are very versatile and able to conquer any woman of fashion. The ease of installation and the multiplicity of options for filing an image pleasantly surprised. Be bold in your desires, and you can conquer the whole world.
And how do you hairstyle from the tails with elastic bands and wedding hairstyles with a wreath?
How to make a sloppy bunch on the head with a rubber band?

Long hair is undoubtedly a beautiful decoration for a female head, but it promises serious work on the care and creation of hairstyles.
Today we offer to consider options for how to independently make a beautiful beam on the head at home in various ways: with the help of an elastic band, donut, hairpin, on the side, high on the crown, etc.
Consider options for medium (shoulder length) and long (to the middle of the back and below) hair, straight and curly with step by step instructions. And also we will offer you a photo and video on the topic.
Try 7 methods how to make a beautiful bunch of hair with step by step photos and videos


You are here: Home »Hairdressing» Hairstyles »Evening Hairstyles
Carefully collected hair opens a beautiful neckline and gives the image a nobility and elegance.
A variety of bundles are irreplaceable both in everyday life and at festive events.
Due to the wealth of forms and the ability to vary their placement, beams are suitable for women of different ages and having hair of different thickness and texture.
The use of jewelry, braids, harnesses turns a casual bun into an evening hairstyle, suitable for both a festive dress and a more modern trouser suit.
What you need to know about the hair bun?
Carefully collected hair opens a beautiful neckline and gives the image a nobility and elegance.
A variety of bundles are irreplaceable both in everyday life and at festive events. Due to the wealth of forms and the ability to vary their placement, beams are suitable for women of different ages and having hair of different thickness and texture.
A simple and spectacular hairstyle with a bagel, will allow in a few minutes to transform from a girl with disheveled hair, like Vika from the “Kitchen” into a lady with evening styling for a ball, reception or banquet.
Pluses bunches with a bagel:
- no bouffant
- will suit even sparse hair,
- worth trying owners of medium hair length and long
- 10-15 minutes is enough to create such a hairstyle,
- minimum amount of styling products
- options with bangs and without.
Let's look at the options for medium length and long hair. The proposed options for beautiful beams will be demonstrated on both the model and self-created on your own hair.
A bunch of short hair to the shoulders will show in the video workshop Lily Moon.
Short and medium length hair bundle (Gibson roller)
Insufficiently long hair is not a reason to deny yourself elegant bunches. There are many variants of this hairstyle, for which the average length is also suitable, for example, a Gibson roller, which is easy to perform.
- If there are bangs, separate it and temporarily fix it until the end of work.
To lay a long bang in the form of a “French braid”, to do this, divide it into three strands and start weaving, moving along the edge of the hair to the back of the head. - During work, add free hair to the working strands only from the face, trying to separate even bunches.
- At the level of the ear go to the weaving of ordinary pigtails.
- Loose hair is collected with a rubber band in the tail - a soft ring.
- The hair above the ring is divided in half.
- The tail formed by the ring is placed into the cavity, wrapping it inside.
- The resulting inner roller gently level and smooth.
- The free tip of the pigtail fill in the cavity and fasten the entire structure with stealth.
- Spray the finished hair with lacquer.
Laying looks elegant and elegant. If the bang is short, it is laid in the last place.
Tip: With this hairstyle, you can correct the round shape of the face. To do this, the hair is high at the top of the comb to give volume, and the side strands curl curls and leave loose. The stretched lines make the face visually narrower.
Learning to create a hairstyle bun for medium length hair (Gibson roller) with your own hands
The original bundle of fishtail braid
Consider several options for this hairstyle:
- from a tail with 1 slanting fish tail,
- from a tail with 2 and more braids.
The advantages of creating a hairstyle from several braids at once are a more voluminous and elegant bunch. From one braid it turns out not so spectacular and it will suit owners of thicker hair or the braid itself needs to be made more voluminous.
The more braids, the smarter your bundle will look.
Photoinstruction to create a beam
- Hair combed and collected in a low “horse tail”.
- Divide the tail into two strands.
- From each strand take the upper part and braid the fishtail braid.
- To do this, from each of the two halves of the “tail” on the side, separate them along a narrow strand and move them to the center, distributing alternately under each main half of the hair.
Step-by-step instruction of execution in video format with detailed explanations and visual simple operations.
Tip: if the hair is not thick enough, the strands slightly combed or artificially added to the weave. The finished fishtail can be stretched slightly to add volume. Do not overdo it - too elongated, disheveled strands will give hairstyle carelessness.
Beautiful bun with the help of a donut: light hairstyle for prom, evening, wedding for medium or long hair
Special linings from porous and very light materials help to make beautiful and neat styling with bunches. For bunches of different shapes and sizes, they use “donuts” or “donuts”, which match the color of your own hair, so that they are invisible in the hair.
With the help of these simple accessories are created elegant and elegant hairstyles.
Instructions with step by step photos:
- Carefully comb your hair.
- Using a comb with a thin "tail" to separate the thin strands of hair on the sides.
- Remove strands before completion.
- The remaining hair to collect in a low “tail”.
Such a simple, but very spectacular hairstyle will look great on the bride, it is easy to attach a veil or wedding wreath to her.
Bundle at home, without a hairdresser
There are many styles that look very impressive and appear to be very complex in design. In fact, you can make such hairstyles at home without the help of a wizard.
- To comb her hair in a high “tail”.
- Hair put in a circle "palm", carefully combed.
- Separate the two adjacent strands and tie them into a ring.
- Pin the resulting loop with a pin.
- Separate the next strand in a circle.
- Link it with the two strands of the previous loop joined together and form a new ring.
- Secure with a stud.
- Continue laying in a circle until all the loose strands are connected and pinned.
- Weave the remaining ends into a pigtail. The ends tie with a rubber band.
- Pigtail to remove under the finished hairstyle, fix the studs.
- Correct styling and spray varnish.
- Decorate with decorative pins.
Tip: try to separate uniform strands and start from the back of the head. In this case, it will be easier to hide the ends, and the styling will be symmetrical.
Bublik: hairstyle-chignon in retro style
- From long hair, you can make an original hair-chignon in retrostyle.
- Comb hair and separate a strand of hair from the face (or long bangs).
- Make a zigzag parting.
- The bulk of the hair collected in the "tail" at the back.
Hairstyle with exquisite design options
In the evening, you need to go to visit, to the theater or to a party, but there is no time to go to the salon? You can make a beautiful evening hairstyle yourself.
- Smooth hair collected in a high “tail”.
- Separate two identical strands on the sides.
- Cross them to give hair volume.
- Comb the hair and tie the ends with a rubber band.
- To level a bunch, and to hide the free ends under it, having fixed the invisible.
- Pin up strands with pins.
- Fix with spray or varnish.
- Decorate with hairpins.
It will not take too long to create such spectacular and uncomplicated hairstyles, and from the tools only a smoothing brush and a comb with a thin “tail” to separate the strands. Beautiful high hair goes all and can not only beautify a woman, but also emphasize her good taste and ingenuity.
Detailed training video
Step-by-step instruction with a photo to create an evening hairstyle - a beautiful bun with a bagel
Look at the photo with different versions of the beams, pay attention to the different number of harnesses and accessories decorating it.
Instructions with step-by-step photos for each stage of creating hairstyles:
- Prepare hair for hair. Scouring and unraveling all the nodules.
- We collect hair in a low tail, at will its height varies by you.
- We divide into 2 equal width strands.
- Put the bottom strand aside or stab with a clip.
- We apply the donut to the head and see that it is placed evenly on the head, and the distance from the tail to the edge of the donut is the same from 2 sides.
- Fix a bagel on both sides of the tail with the help of studs, sometimes used stealth.
- Pin piercing is best done by darning for a more secure grip.
- Wrap a donut, top strand, starting at the bottom. Fix it with a rezinochka just above the bagel, so that you can hide the ends under it.
- Hide the tips behind the bagel, if necessary, pin a hairpin.
- Spread your hair evenly on a bagel. Closing all parts of the same thickness strands.
- It is advisable now to sprinkle the beam with varnish, this will give it a smooth and neat look.
- We proceed to work with the left strand. We divide it into 4 equal parts. We braid them braids from 2 strands. To do this, divide the delayed strand into 2 sections and start the left strand on the right, turning it clockwise 3 times.
- This operation must be repeated until the end of the strand.
- Repeat to yourself: we start a lock, we scroll 3 times clockwise.
- At the end of each harness we fix weaving with rubber band. Repeat operations with all strands, we recall that you have them 4. (Make more or less flagella (3.5) experimenting with variations of this hairstyle).
- We connect all the strands with a rezinochkoy over a bagel, then hide the tips behind the beam, pushing them inside with a finger.
- An important stage of fixing hairpins to flagella kept throughout the evening.
- Spread the flagella evenly on the bundle, check their symmetry.
- Spray varnish on the finished hairstyle and treat hairline on the forehead for owners of bundled hair on the forehead. To owners of a bang, to lay it at will having wound or having leveled, having put in a braid or a plait.
- Add hair accessories to make a casual bun a festive one. Use combs, barrettes, screwed rhinestones.
- The hairstyle is ready, now is the time for the ball!
Hairstyle with a roller and a volume braid
Braid the French braid by separating the average width of the hair strand from the frontal part and moving to the back of the head.
Then we make a bundle, make sure we smooth it and make it aesthetically pleasing.
When everything is ready, we put the scythe from its forehead and effectively decorate it with studs to the beam,
A detailed lesson in the video format for creating hair with a roller and a volume braid in the evening version:
How to make a beautiful bunch of hair with gum?
This spectacular beam is suitable as an option for everyday wear or when you are in a hurry, and you do not want to go with her hair loose or this is not appropriate.
Suitable for medium length or long hair.
Prepare: gum is not clinging to the hair, studs.
- Combing hair and putting gum on your hand.
- We collect hair with a hand in a tail, straightening cocks behind and removing them.
- We thread the ends of the tail into the gum to the middle of the length, and then once again wrap the gum around the tail.
- We straighten our resulting bundle and pin with the pins the places where we need to fix it.
- Decorate the beam with a hairpin at will or effectively lay a bang.
The video will teach you how to make a beautiful bunch with a rubber band in 3 minutes:
Experiment with placing a bagel and choose the most beautiful and comfortable option for you. Now it remains only to make a choice, which of the beams you want to do right now?